Configuration
Admin Console
The admin console is used to install and configure your DeepSource enterprise installation.
The Admin Console contains the following sections:
-
Application
- Dashboard
- Version History
- Config
- Troubleshoot
- License
- View files
- Registry settings
-
GitOps
-
Cluster Management
-
Snapshots
Application
The Application tab is used for installing and upgrading the DeepSource Enterprise application, configuring your installation, etc.
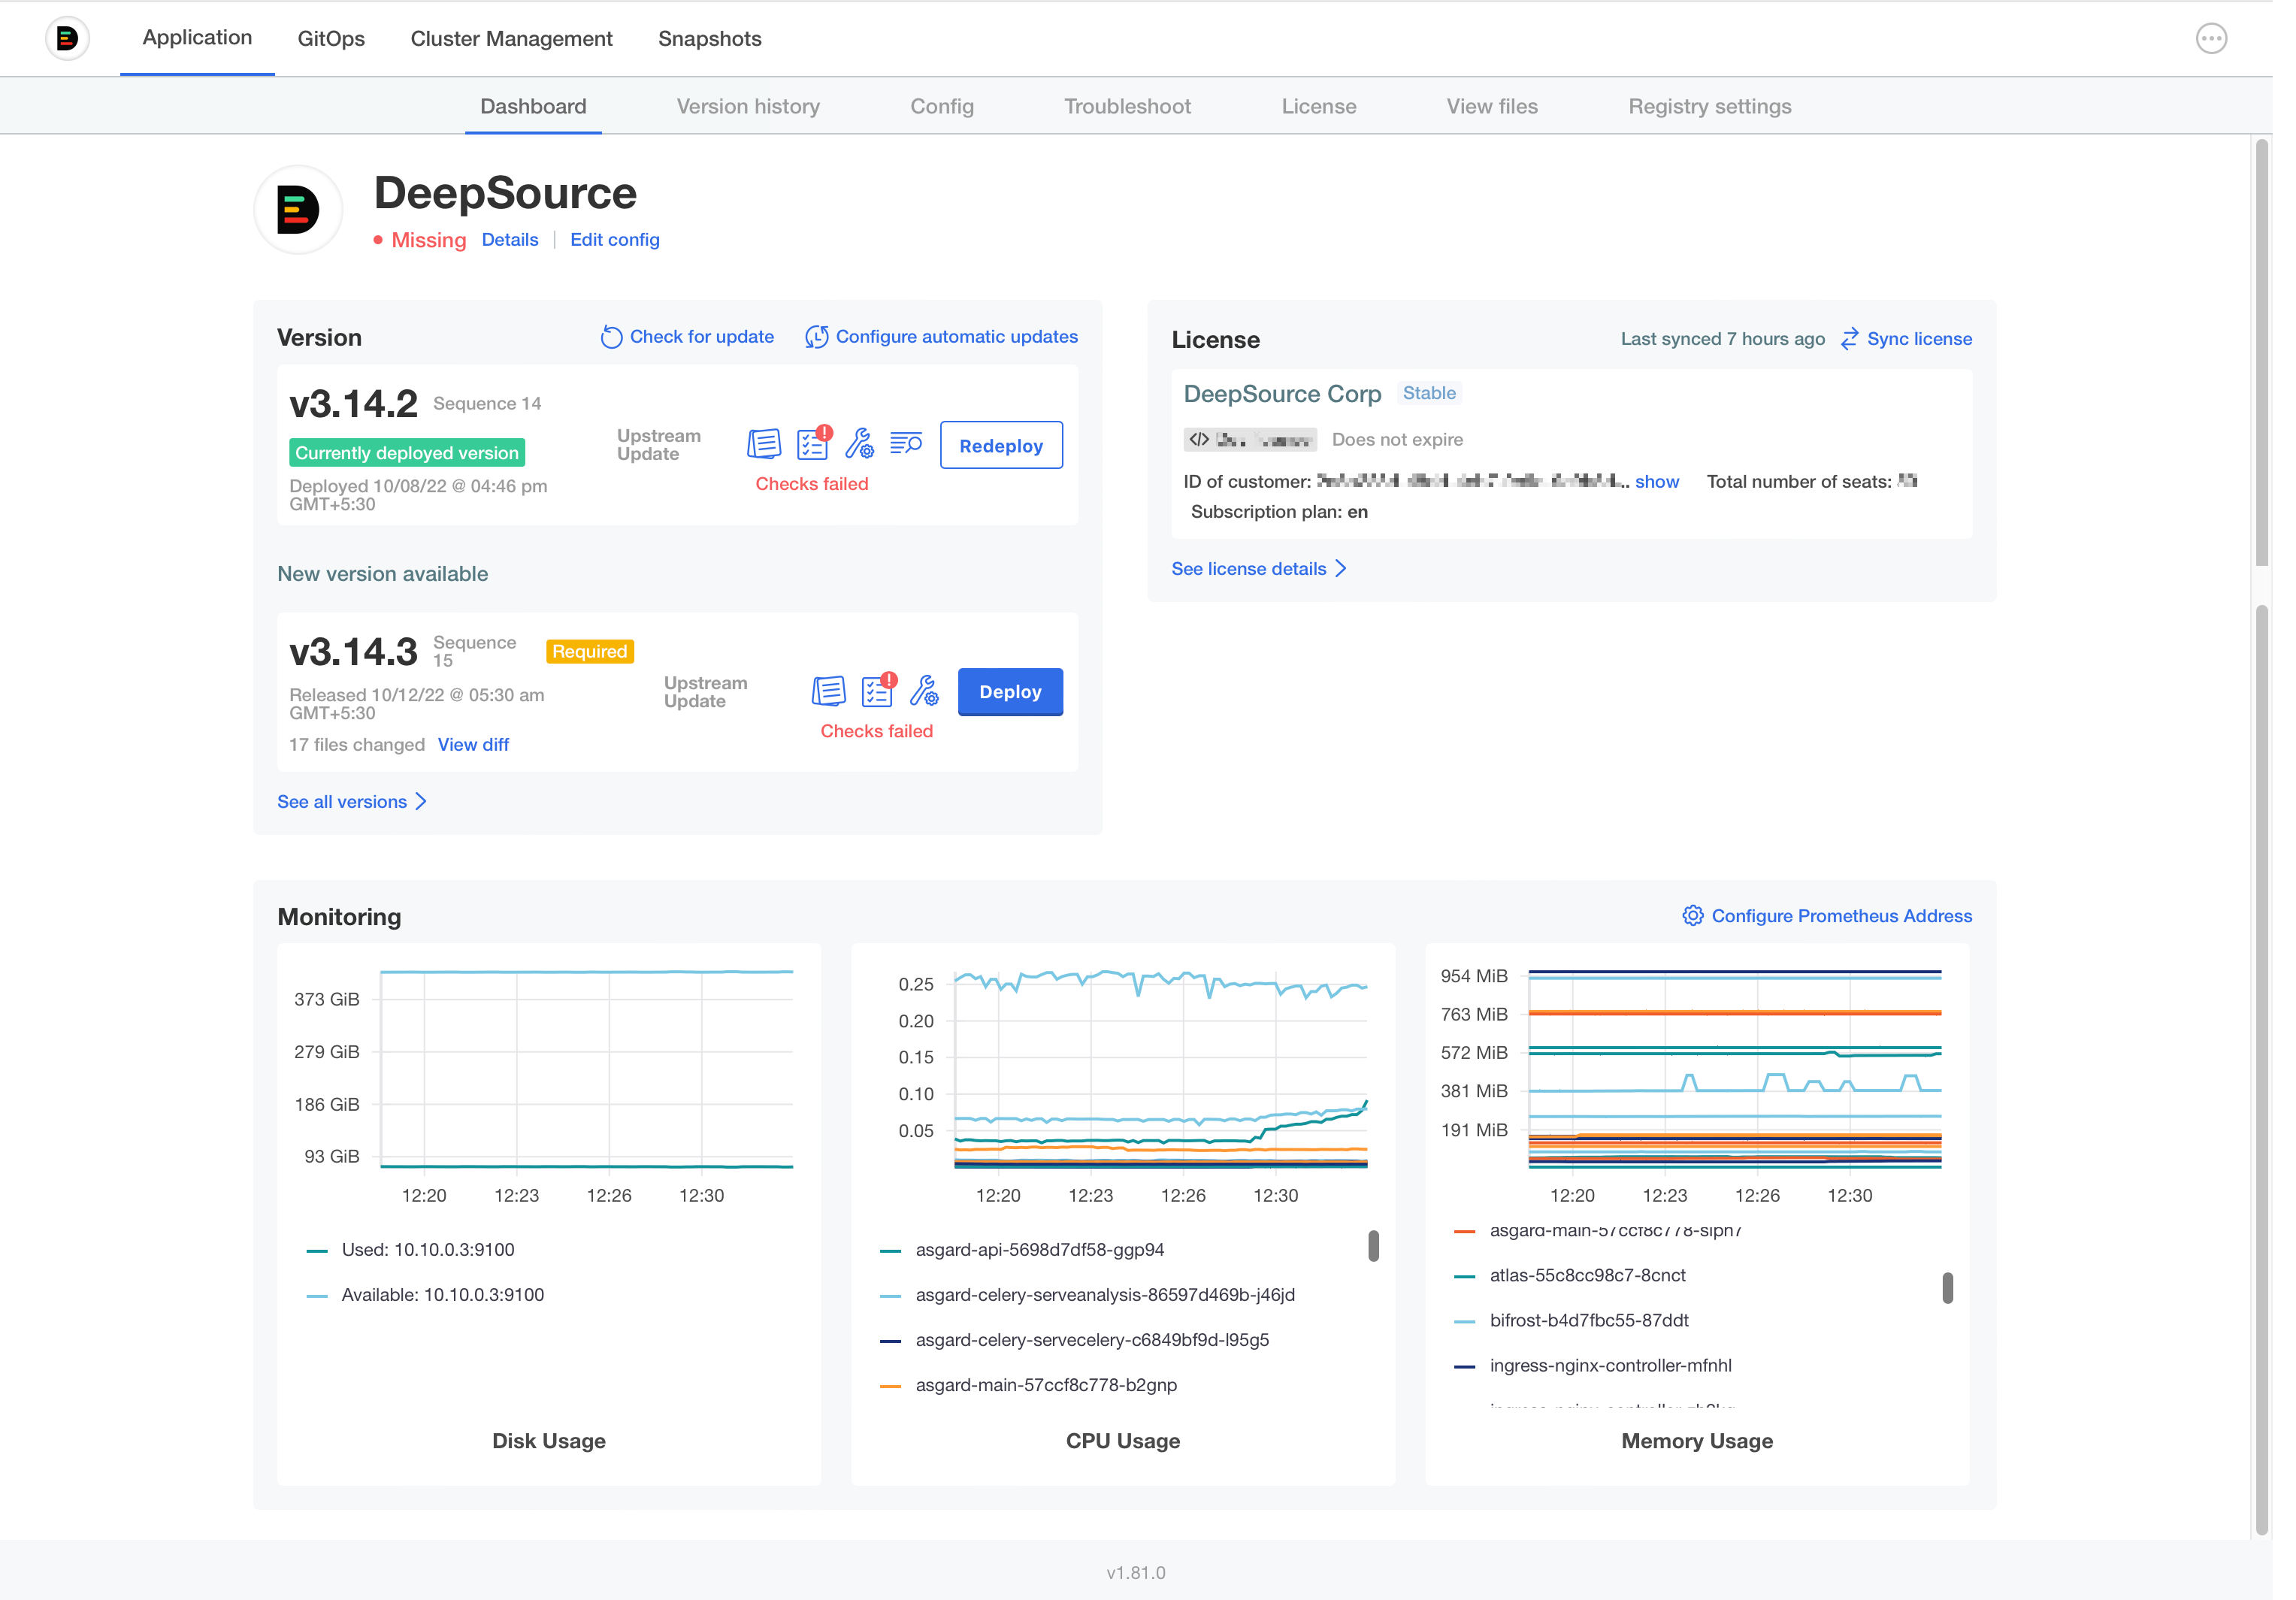
Dashboard
The Dashboard section shows you a quick preview of the state of your application.
Version history
The Version History tab shows you all versions of the DeepSource application that are available to you. Clicking on the Deploy button will deploy the selected version of the app to your cluster.
Some releases are marked as
Required. For upgrading to the latest version, you must deploy allRequiredversions in order between your current version and the latest version before upgrading to the latest version.
You can press the Check for update button to check for new updates that may be available.
Config
This tab is used to configure your DeepSource app.
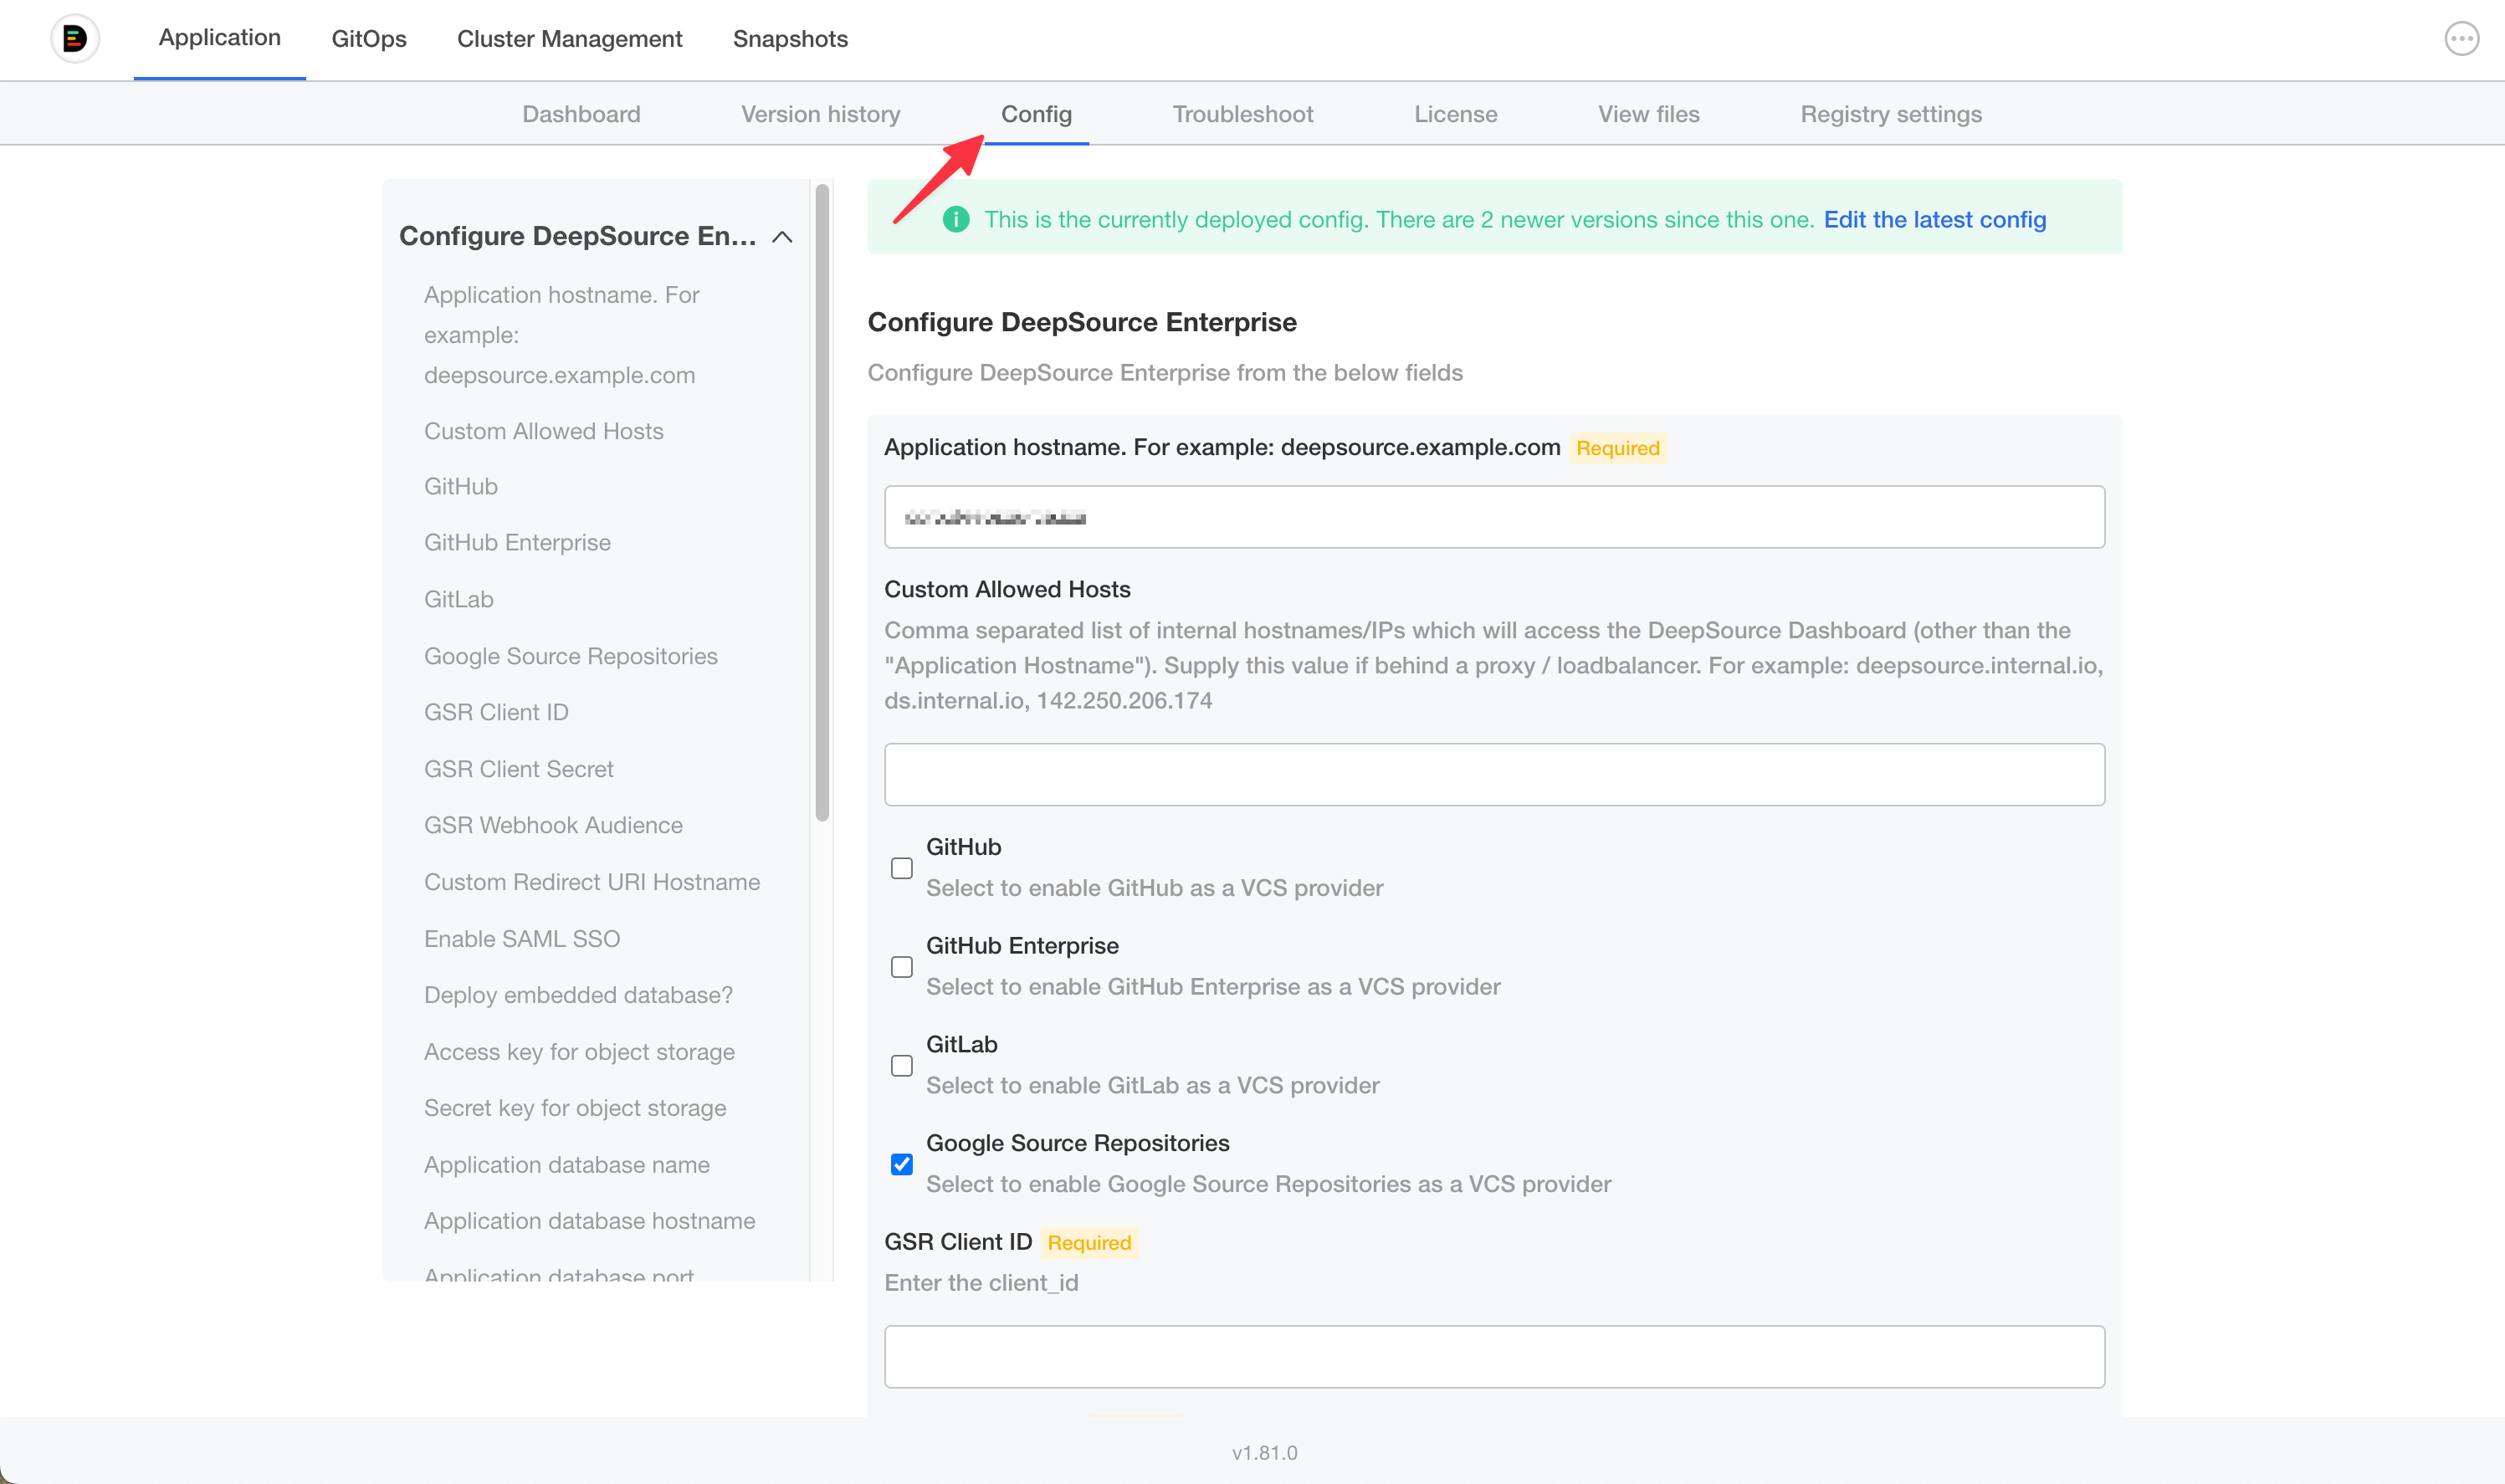
Application hostname: Provide the primary hostname/IP through which you will access the DeepSource application. Please note that your version control system should be able to send webhooks to the application using this hostname/IP.
Custom Allowed Hosts: Allows you to provide additional hostnames or IP addresses that must be whitelisted by the application. This can be useful when internal services within your network use a different hostname to access the DeepSource application.
Version Control Provider: Select and configure a Version Control Provider to integrate with your DeepSource application. DeepSource Enterprise currently supports the following Version Control Providers:
Selecting any Version Control Provider will show additional configuration options to configure. A detailed guide to integrating with your Version Control Provider is available in the Setup section of the docs.
Enable SAML SSO: Configure SAML SSO for your application. A guide to integrating your SSO provider is available in the SSO section of the docs.
Deploy embedded database: The application will automatically provision an embedded database within the cluster when enabled. This is often recommended for pilot installations and is not recommended in production. A detailed guide on setting up an external database is available here.
Access key for object storage: Random value to be used as an access key for Minio object storage. If not entered, a default value is kept.
Application database username: PostgreSQL Database username.
Application database password: PostgreSQL Database password
Upload TLS certificate and private key?: This option is used to configure the TLS settings. A detailed guide on setting up TLS is available here.
Node selectors: DeepSource contains two classes of workloads. The application workloads and the analysis workloads. Separating application workloads from the analysis workloads is highly recommended. This is done to prevent resource contention surges from affecting your application. You can attach node labels for your nodes using the following command: @vishnu to document.
- Node selector label for application workloads: Set the labels to identify nodes that will run the application workloads. Eg:
deepsource: application - Node selector label for analysis workloads: Set the labels to identify nodes that will run the analysis workloads. Eg:
deepsource: analysis
DeepSource Enterprise Admins: Enter a comma-separated list of users who will have access to the Enterprise Control Panel. You can add these e-mail addresses pre-emptively, and once the user with the e-mail address onboard, they will have access to the Enterprise Control Panel.
Cluster Management
This section would be visible if you are using the Standalone installation method. The cluster management section provides information about the nodes in your cluster. The cluster management portal allows you to:
- Drain node: This lets you safely drain a node. This can be used when you need to restart or delete a node.
- Add a Node: This will generate a command you can execute to add a newly provisioned node to your cluster.
Snapshots (Cluster metadata backups)
You can back up your cluster metadata through the Admin Console. Advanced documentation for this is directly available on Replicated documentation page.
Bring your own Database
DeepSource Enterprise uses a PostgreSQL database to store persistent data. By default, an embedded database is provisioned within the Kubernetes cluster. However, we highly recommend bringing your own PostgreSQL database for production deployments. This document walks through the steps to set up an external database.
Recommended version: PostgreSQL 12
Setting up your database
On a fresh PostgreSQL database, you would have to create a new database and set up a user with sufficient privileges before configuring it for use with DeepSource app.
Following are sample steps to do this on a generic PostgreSQL database. Your steps may vary if you use a managed database like AWS RDS or Google CloudSQL.
Log into your database with the postgres user:
psql postgresCreate a new database:
CREATE DATABASE <db-name>;Create a new PostgreSQL user for the application to use:
CREATE USER <user-name> WITH ENCRYPTED PASSWORD '<password>;Grant privileges to the database user:
GRANT ALL PRIVILEGES ON DATABASE <db-name> TO <user-name>;Enable the vector extension on the application database:
DeepSource Enterprise Server v5.0.0 and later require the pgvector extension on the application database. Connect to the application database as a user with permission to create extensions (typically postgres) and run:
\c <db-name>
CREATE EXTENSION IF NOT EXISTS vector;
If this step is skipped, the asgard-migrate-job will fail with type "vector" does not exist during the v5.0.0 (or later) upgrade.
Important: Ensure that the
max_connectionsparameter for the PostgreSQL application is set to at least500. You will have to set a suitableshared_buffersvalue for this value.
Configuring your app to use the external database
-
Log into the Admin Console.
-
Navigate to the Config section in the admin console.
-
Select
Nofor the fieldDeploy embedded database? -
Enter the following values for the corresponding fields:
- Application database name: Enter the name of your database name that was created for DeepSource.
- Application database hostname: Enter the hostname/IP of your PostgreSQL server.
- Application database port: Enter the port on which your PostgreSQL instance is configured. The default value for this field is
5432. - Application database username: Enter the database username that you created for the database.
- Application database password: Enter the database password for the database user you used in the previous step.
-
Click on
Save Configto persist this configuration. -
Navigate to the Version History page.
-
Click
Deploy. -
The application will be redeployed with the new database.
Moving from an embedded database to an external database
If you intend to switch to an external database and you have been using DeepSource Enterprise for a while, you will face data loss. You can, however, use these steps to take a database backup and restore it on to the new database.
-
Create a backup using the pg_dump utility.
pg_dump -h <hostname> -U <username> -d <db_name> -v > dump.sql -
To get the hostname, password, database name and the database user, run the following command:
kubectl exec -it deploy/asgard-main -- cat /secrets/.env | grep ASGARD_DB_- The above command will output the info in the below format:
ASGARD_DB_NAME='asgard'
ASGARD_DB_USER=asgard-enterprise
ASGARD_DB_PASSWORD=********
ASGARD_DB_HOST='postgresql-ha-pgpool.default'
ASGARD_DB_PORT='5432'- To get the hostname IP, run
kubectl get svc | grep pgpooland use the IP for the service as the hostname. - You can use pg_restore to apply the dump to your new database.
Database Backups
DeepSource Enterprise Server does not create database backups. Please make sure to enable backups by configuring the database hosting provider.
Setup TLS
We highly recommend using TLS with your DeepSource Enterprise installation. There are multiple ways to enable TLS on DeepSource Enterprise Server. You can configure these options on the Admin Console.
Upload your own TLS certificate and private key
Setting this option to Yes will allow you to upload your TLS certificate and private key. Upload the TLS certificate and private key and click Save Config. Deploy the latest version to begin using your site with TLS.
Let DeepSource provision a TLS certificate
By selecting No to the above option, DeepSource will automatically use Let's Encrypt to provision a TLS certificate for your site. Please note that Let's Encrypt will attempt a domain validation challenge. To validate the certificates, your site would have to be reachable by the Let's Encrypt server.
No TLS
If this option is selected, no certificates will be installed by DeepSource. This option is useful if you choose to terminate TLS upstream.
Use Gateway API
Gateway API requires Enterprise Server v5.0.2 or later and is currently only available for exisiting cluster installations.
DeepSource Enterprise supports the Kubernetes Gateway API. When enabled, it creates an HTTPRoute attached to an existing Gateway instead of an Ingress.
Prerequisites
- A Gateway API controller that supports
RegularExpressionpath matching. - An existing
Gatewayresource whose listeners allow routes from DeepSource's namespace.
Configuration
In the Admin Console Config section, set Use Gateway API? to Yes and provide:
| Field | Required | Description |
|---|---|---|
| Gateway Name | Yes | parentRef.name of the existing Gateway. |
| Gateway Namespace | Yes | Namespace the Gateway lives in. |
Toggle Show advanced Gateway configuration for the rest:
| Field | Description |
|---|---|
| Gateway Section Name | Listener on the Gateway to attach to (e.g. https). Required when the Gateway has multiple listeners. |
| Gateway Port | Listener port to attach to. Only needed for port-based routing. |
| Gateway Group | API group of the parent referent. Override only for custom Gateway implementations. |
| Gateway Kind | Kind of the parent referent. Override only when attaching to a non-Gateway kind. |
| Additional Gateway parentRefs | YAML list of extra parentRefs — use this to expose the same route through multiple Gateways. |
| HTTPRoute annotations | Annotations on the generated HTTPRoute, e.g. for controller-specific timeouts or retries. |
Save and deploy. DeepSource creates one HTTPRoute that routes traffic to its services through the configured Gateway.
Bring Your Own Key (BYOK)
BYOK requires Enterprise Server v5.0.0 or later.
Bring Your Own Key (BYOK) lets you run AI-powered features using your own model provider credentials. With BYOK, inference calls route directly from your Enterprise Server to your chosen provider. Your code never leaves your infrastructure to reach third-party AI services through DeepSource.
BYOK is useful when you:
- Have existing cloud commitments with negotiated rates for AI services
- Need to meet data residency or compliance requirements
- Want full control over which models power your AI features
Supported providers
| Provider | Access method |
|---|---|
| Google Vertex AI | GCP service account or Workload Identity |
| AWS Bedrock | AWS bearer token / Inference profile |
| Azure OpenAI | Azure API key |
| OpenAI | API key (also supports OpenAI-compatible endpoints via custom base URL) |
| Google AI (Gemini) | API key |
| Anthropic | API key |
Model tiers
DeepSource uses two model tiers for different tasks:
| Tier | Field | Powers |
|---|---|---|
| Flagship | Model/deployment name for flagship tier | Primary AI features |
| Versatile | Model/deployment name for versatile tier | Auxiliary AI tasks |
Supported models
Ensure the following models are enabled and accessible in your provider account. DeepSource automatically selects the appropriate model for each task.
| Provider | Flagship | Versatile |
|---|---|---|
| Google Vertex AI | gemini-2.5-pro, gemini-3.1-pro-preview | gemini-2.5-flash, gemini-3.1-flash-lite-preview |
| AWS Bedrock | us.anthropic.claude-sonnet-4-6 | us.anthropic.claude-haiku-4-5-20251001-v1:0 |
| Azure OpenAI | gpt-5.3-codex | gpt-5.1-codex-mini |
| OpenAI | gpt-5.3-codex | gpt-5.1-codex-mini |
| Google AI (Gemini) | gemini-3.1-pro-preview | gemini-3.1-flash-lite-preview |
| Anthropic | claude-sonnet-4-6 | claude-haiku-4-5-20251001 |
For Google Vertex AI, the exact models used may vary by region. Setting GCP Model Location to global allows you to use newer preview models.
Configuring BYOK
- Log into the Admin Console.
- Navigate to the Config section.
- Under AI Model Provider, select your provider.
- Fill in the provider-specific fields described below.
- Set the Model/deployment name for flagship tier and Model/deployment name for versatile tier.
- Click Save Config and deploy the latest version from the Version History page.
Provider configuration
Select Google Vertex AI as the AI Model Provider.
| Field | Description | Required |
|---|---|---|
| GCP Project ID | Your GCP project ID | Yes |
| GCP Model Location | GCP region (e.g., us-central1). See supported regions | Yes |
| GCP Authentication Type | Choose between Workload Identity or Service Account Key. If using Service Account Key, upload your service account JSON key file. | Yes |
If you select Workload Identity, the application uses the default credentials available to the pod (e.g., Workload Identity). No additional key file is needed.
Select AWS Bedrock as the AI Model Provider.
| Field | Description | Required |
|---|---|---|
| AWS Region | AWS region where your Bedrock models are hosted (e.g., us-east-1). See supported regions | Yes |
| AWS Bearer Token | Bearer token to authenticate with Bedrock | Yes |
| Use Bedrock Inference Profile | Enable this to use a Bedrock inference profile | No |
| AWS Access Key ID | Access key ID for authenticating with Bedrock when using an inference profile | Only when Use Bedrock Inference Profile is enabled |
| AWS Secret Access Key | Secret access key for authenticating with Bedrock when using an inference profile | Only when Use Bedrock Inference Profile is enabled |
Select Azure OpenAI as the AI Model Provider.
| Field | Description | Required |
|---|---|---|
| Azure OpenAI Endpoint | Your Azure OpenAI endpoint URL | Yes |
| Azure OpenAI API Key | Azure OpenAI API key | Yes |
| Azure OpenAI API Version | API version (e.g., 2024-12-01-preview) | Yes |
Use the Model/deployment name for flagship tier and Model/deployment name for versatile tier fields to specify your Azure deployment names.
Select OpenAI as the AI Model Provider.
| Field | Description | Required |
|---|---|---|
| API Key | OpenAI API key | Yes |
| Base URL | Custom base URL | No |
The Base URL field is useful if you use an OpenAI-compatible proxy or endpoint such as OpenRouter or LiteLLM. Leave it empty to use the default OpenAI endpoint.
Select Google AI as the AI Model Provider.
| Field | Description | Required |
|---|---|---|
| API Key | Google AI API key | Yes |
Select Anthropic as the AI Model Provider.
| Field | Description | Required |
|---|---|---|
| API Key | Anthropic API key | Yes |
Switching providers
Changing your model provider is a configuration-only operation. Update the AI Model Provider selection and the corresponding credentials in the Admin Console, save, and deploy. The next analysis run will use the new provider with no migration or downtime.
Use Proxy for External Connectivity
DeepSource Enterprise (v4.4.0+) supports routing outbound traffic through an HTTP/HTTPS proxy server.
Configuring the Proxy
- Log into the Admin Console.
- Navigate to the Config section.
- Set Use a proxy server to access the internet? to
Yes. - Fill in the following fields:
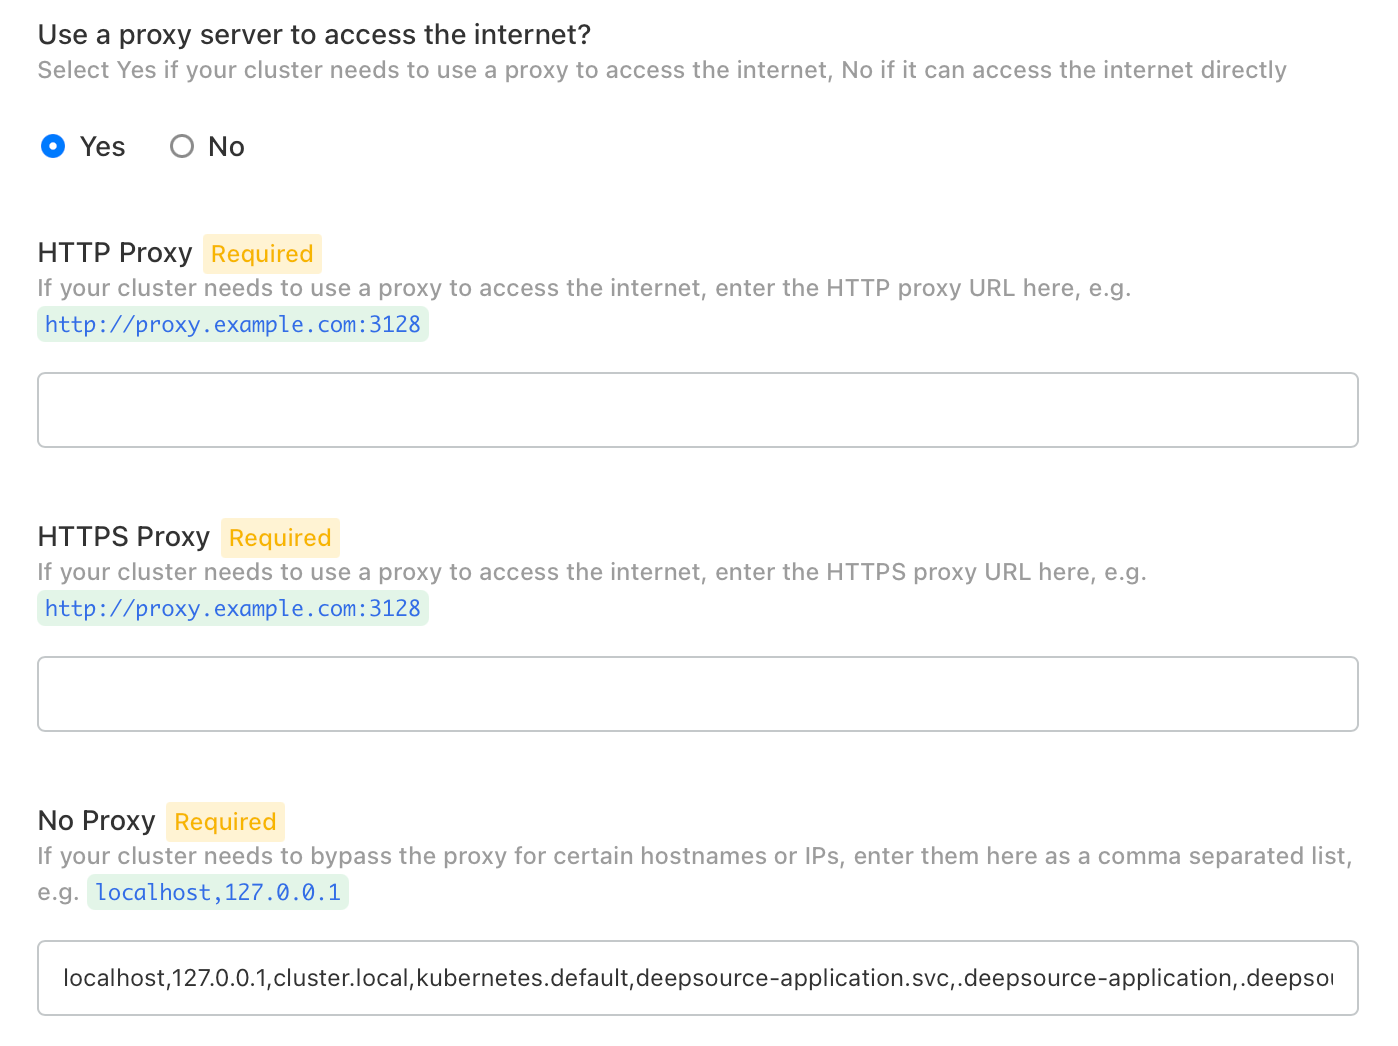
HTTP Proxy: The URL of your HTTP proxy server, e.g. http://proxy.example.com:3128
HTTPS Proxy: The URL of your HTTPS proxy server, e.g. http://proxy.example.com:3128
No Proxy: A comma-separated list of hostnames or IP addresses that should bypass the proxy. Add your VCS host, internal registries, or any other internal addresses alongside the pre-populated defaults:
localhost,127.0.0.1,cluster.local,kubernetes.default,deepsource-application.svc,.deepsource-application,.deepsource,.deepsource.svc,.default,.default.svcIn addition to the hostname kubernetes.default, also add its cluster IP to the No Proxy list. To find it, run:
kubectl get svc kubernetes -n default -o jsonpath='{.spec.clusterIP}'Then append the output to the No Proxy field, e.g. ...,10.96.0.1.
- Click Save Config and deploy the latest Config Change version.
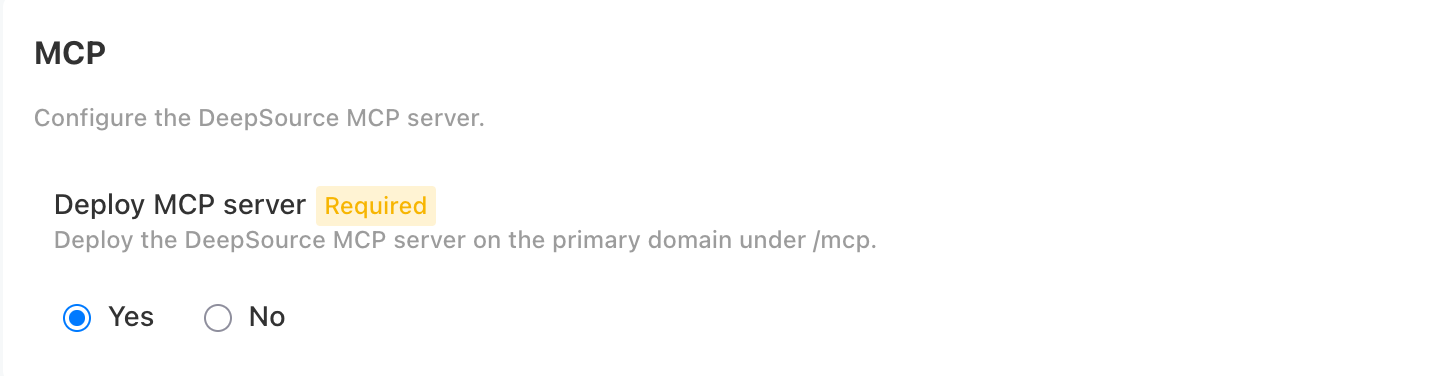
Enable the MCP server
DeepSource Enterprise (v5.1.0+) ships with an MCP server that must be enabled from the admin console. To enable it, follow these steps:
- Visit the Config section in the KOTS Admin Console.
- Scroll down to the MCP section.
- Toggle Deploy MCP Server to Yes.
- Save the config and re-deploy the Config Change version.