
GitHub
Integrating DeepSource with your Github account is done using a Github application.
This document outlines the configuration, permission requirements and app configuration to get started with your Github account and DeepSource Enterprise.
Quick Setup
To create the app, you can run this quick setup script with a few additional steps. This script will open up a website with the Github app creation page and fill in the required fields automatically.
python3 <(curl -s https://raw.githubusercontent.com/DeepSourceCorp/enterprise-assets/master/integrations/create_github_app.py)If you get a 404 page when the quick setup script is run, ensure that you're logged in and that you have the permission to create apps — Admin access — for the respective organization.
-
When you run the command in the CLI, a few user details will have to be filled in:
- The URL of your self-hosted Github instance: For Github Cloud, you can skip this step and leave it blank. This will automatically use the default https://github.com domain.
- An organization slug: If your organization is at https://github.com/my-organization, enter my-organization here.
- The URL of your DeepSource installation: This should be the URL you have configured as the Application Hostname on the Admin Console.
- For a self-hosted Github Enterprise Server installation, this hostname/IP must be reachable by your Github Enterprise Server installation.
- If you are using Github cloud, the URL must be reachable from the IP public internet.
-
The script will open a new browser page. Complete the following steps:
- Scroll to the "Webhook" section and check "Active".
- Supply a random string as the Webhook Secret. Make sure to remember it, as you will need it later.
- Scroll to the User
Permissionssection and selectRead-onlyforEmail addressesandGit SSH Key.
-
Click on Create GitHub App.
-
On the About page, scroll to the Private keys section and click Generate a private key. Keep this key — you'll upload it in the Admin Console next.
-
Note down the following values:
- Your app slug: This can be found in the URL. Copy the value for the
APP_SLUGpart of the URL on the Github app page.https://github.com/organizations/acme_corp/settings/apps/<APP_SLUG> - Application ID
- Client ID
- Client Secret: You can generate this by clicking on the Generate a new client secret button.
- Your app slug: This can be found in the URL. Copy the value for the
-
You will use these values to configure the Github App in the Admin Console. Follow the next steps to continue.
-
Click on
Save configand deploy. (Ensure that you have completed the steps in the Adming Console page before you deploy.) -
Visit the login page on
https://<DEEPSOURCE_HOSTNAME>/loginto start using Github with DeepSource Enterprise.
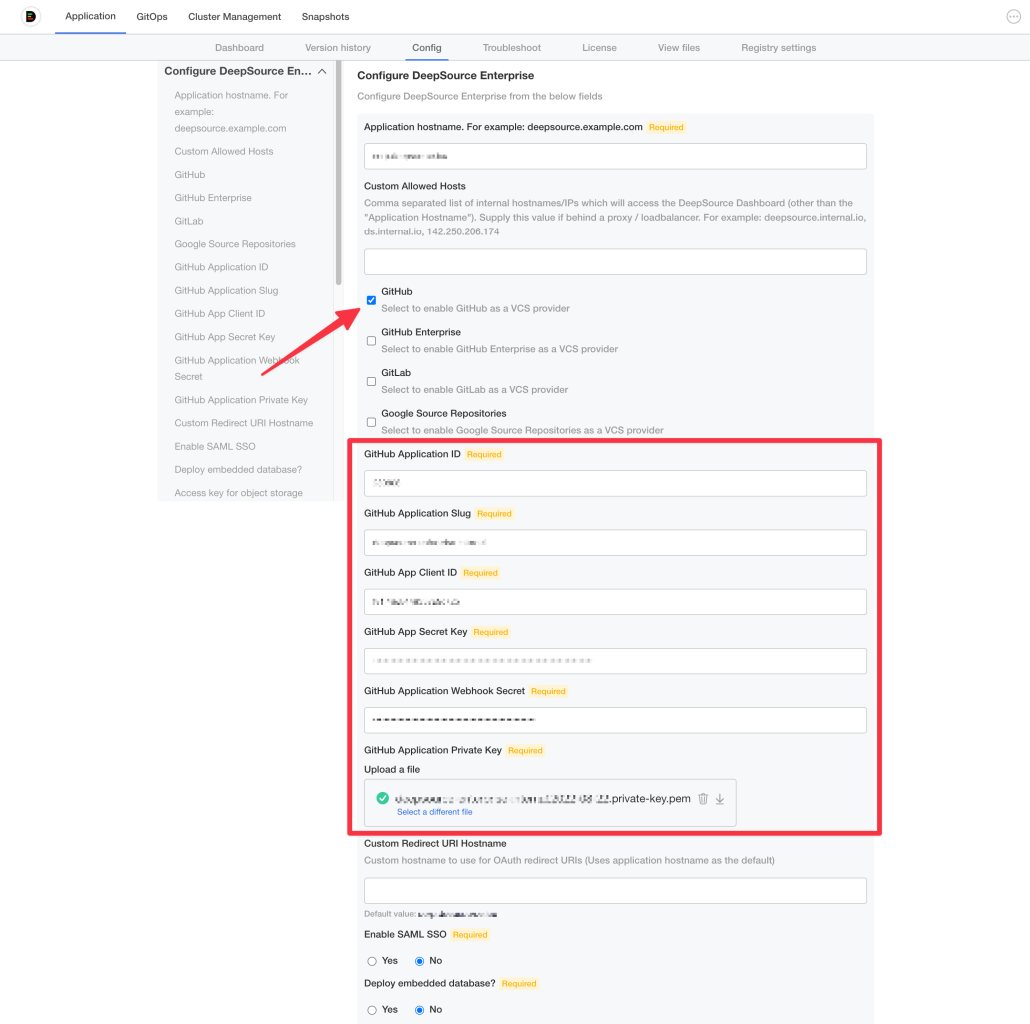
Configuring the Github app in the Admin Console
After you create your Github application, you need to configure these in the Admin Console for the application to use it.
-
Visit the Admin Console
-
Navigate to Application -> Config.
-
Select the checkbox Github
-
Fill up the values from the previous step for:
- Github Application ID
- Github Application Slug
- Github App Client ID
- Github App Client Secret Key
- GitHub Application Webhook Secret
- Github Application Private Key
-
Save
| Permission | Scope | Reason |
|---|---|---|
| Checks | Read and write | Update pull request checks when an analysis is run. |
| Commit statuses | Read and write | For updaing commit statuses in the PR. |
| Contents | Read and write | Get source code during analysis. |
| Metadata | Read-only | The metadata permission provides access to a collection of read-only endpoints with metadata for various resources. |
| Pull requests | Read and write | Create pull requests for autofix. |
| Single file | Read and write | Read and write the .deepsource.toml (optional) |
| Webhooks | Read-only | Receive webhook notifications when the source code changes. |
| Email address | Read-only | To authenticate your user account. |
| Git SSH Key | Read-only | For cloning private repositories. |