User management
The user management section helps you manage your enterprise users, groups, and invitation links from one place.
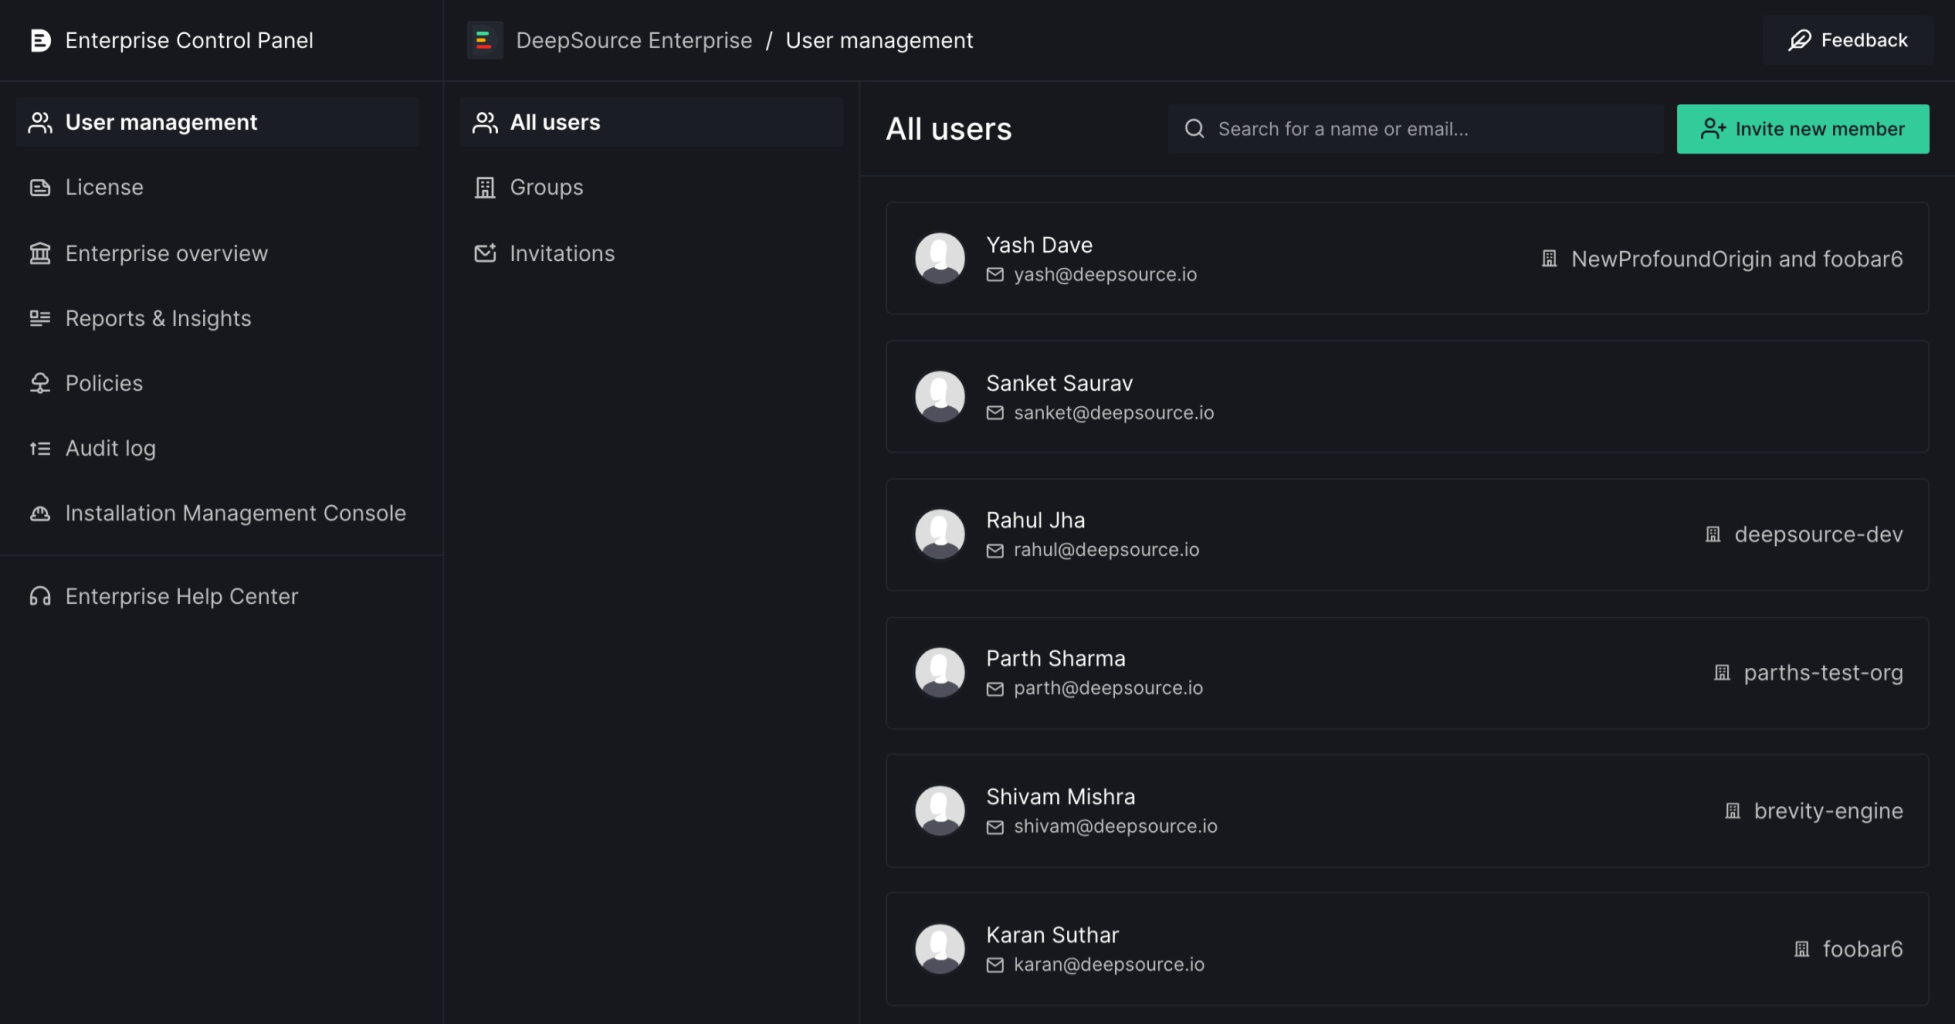
Users
Manage all users within your enterprise from the Users section in user management. Check which groups and teams they are a part of, add them to groups of choice, and remove them if needed!
Create a user
Adding a user to your DeepSource enterprise installation can be done via two ways:
- If your organization uses SSO, please refer to these instructions on setting up an Identity Provider for adding a user.
- If your organization uses a cloud service like GitHub, GitLab, etc as their login method, simply log in with the respective service in order to create an account.
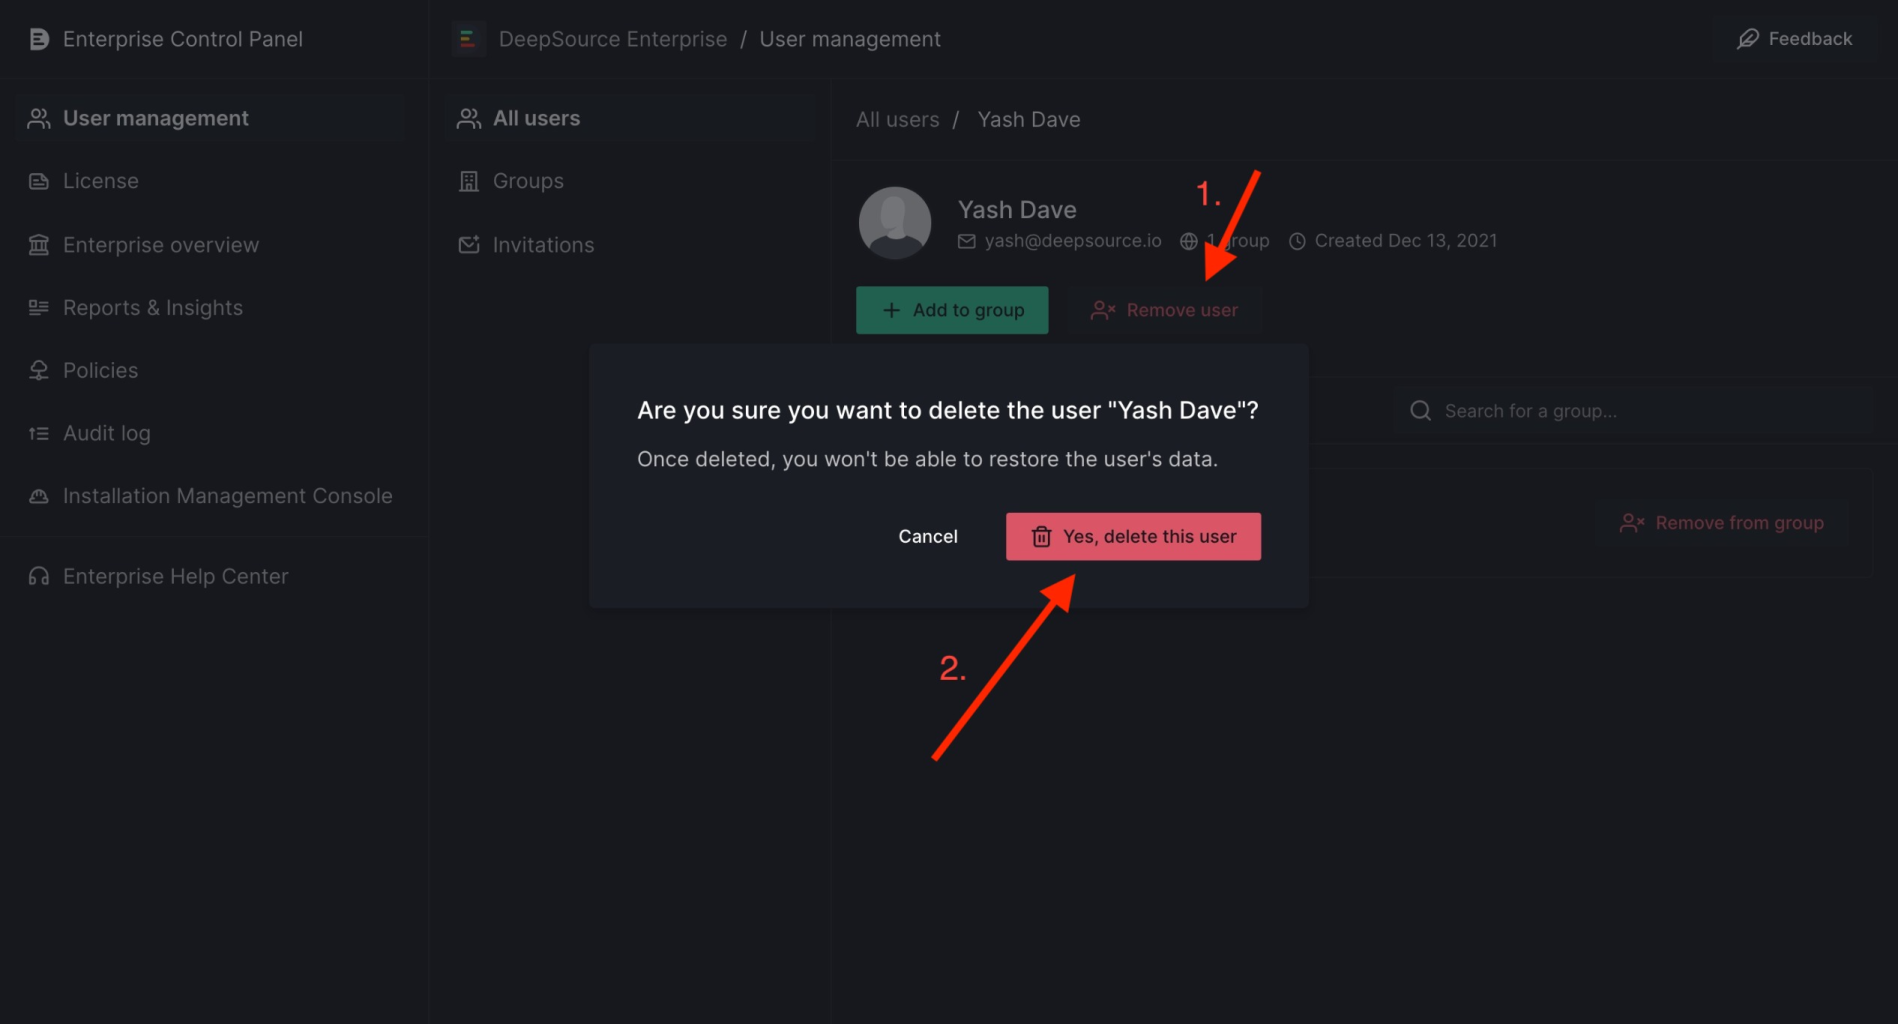
Remove a user
- Navigate to the detailed view of a user via clicking on the user's card.
- Click on the
Remove userbutton in the top description box area for the user. - Verify if the user you have selected for deletion is the correct one. If yes, click on
Yes, delete this user.
This is a destructive action and the user's data won't be recoverable once deleted.
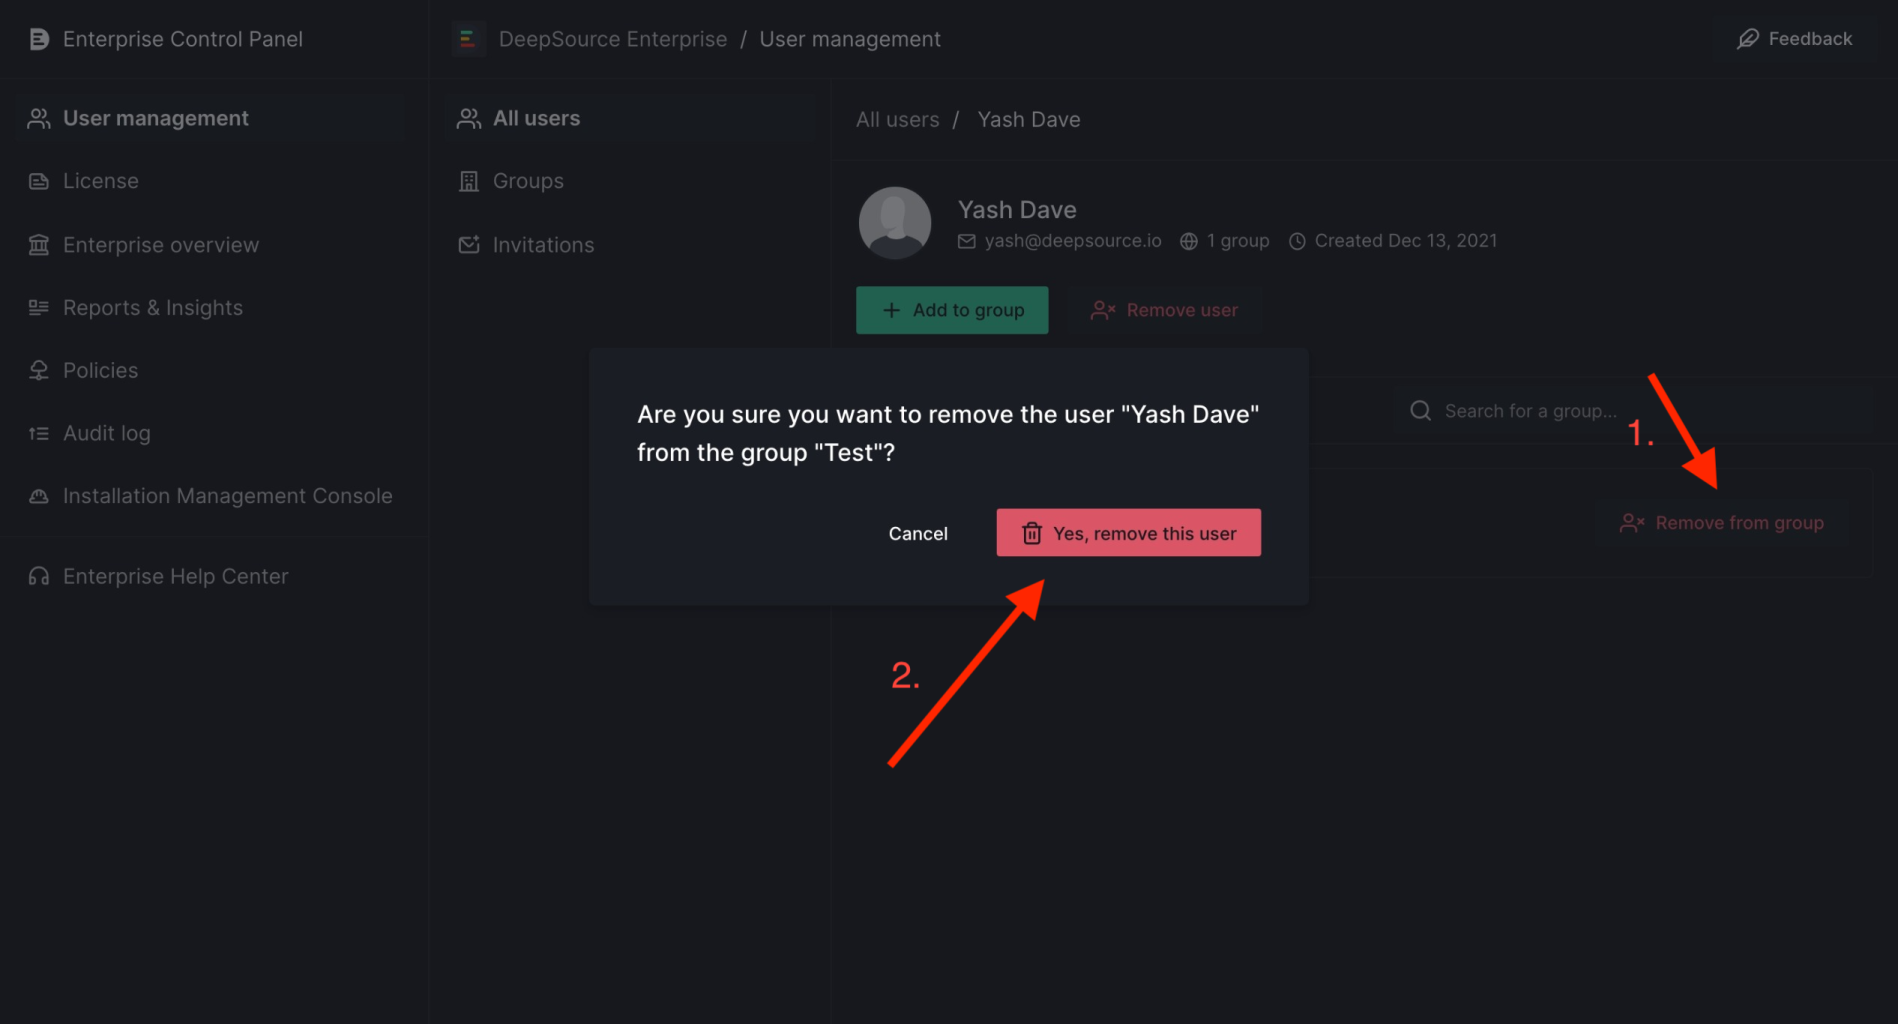
Remove a user from a group
- Navigate to the detailed view of a user via clicking on the user's card.
- Click on the
Remove user from groupbutton present against the group that you want to remove the user from. - Verify the action within the confirm dialog and if correct, click on
Yes, remove this userto perform the action.
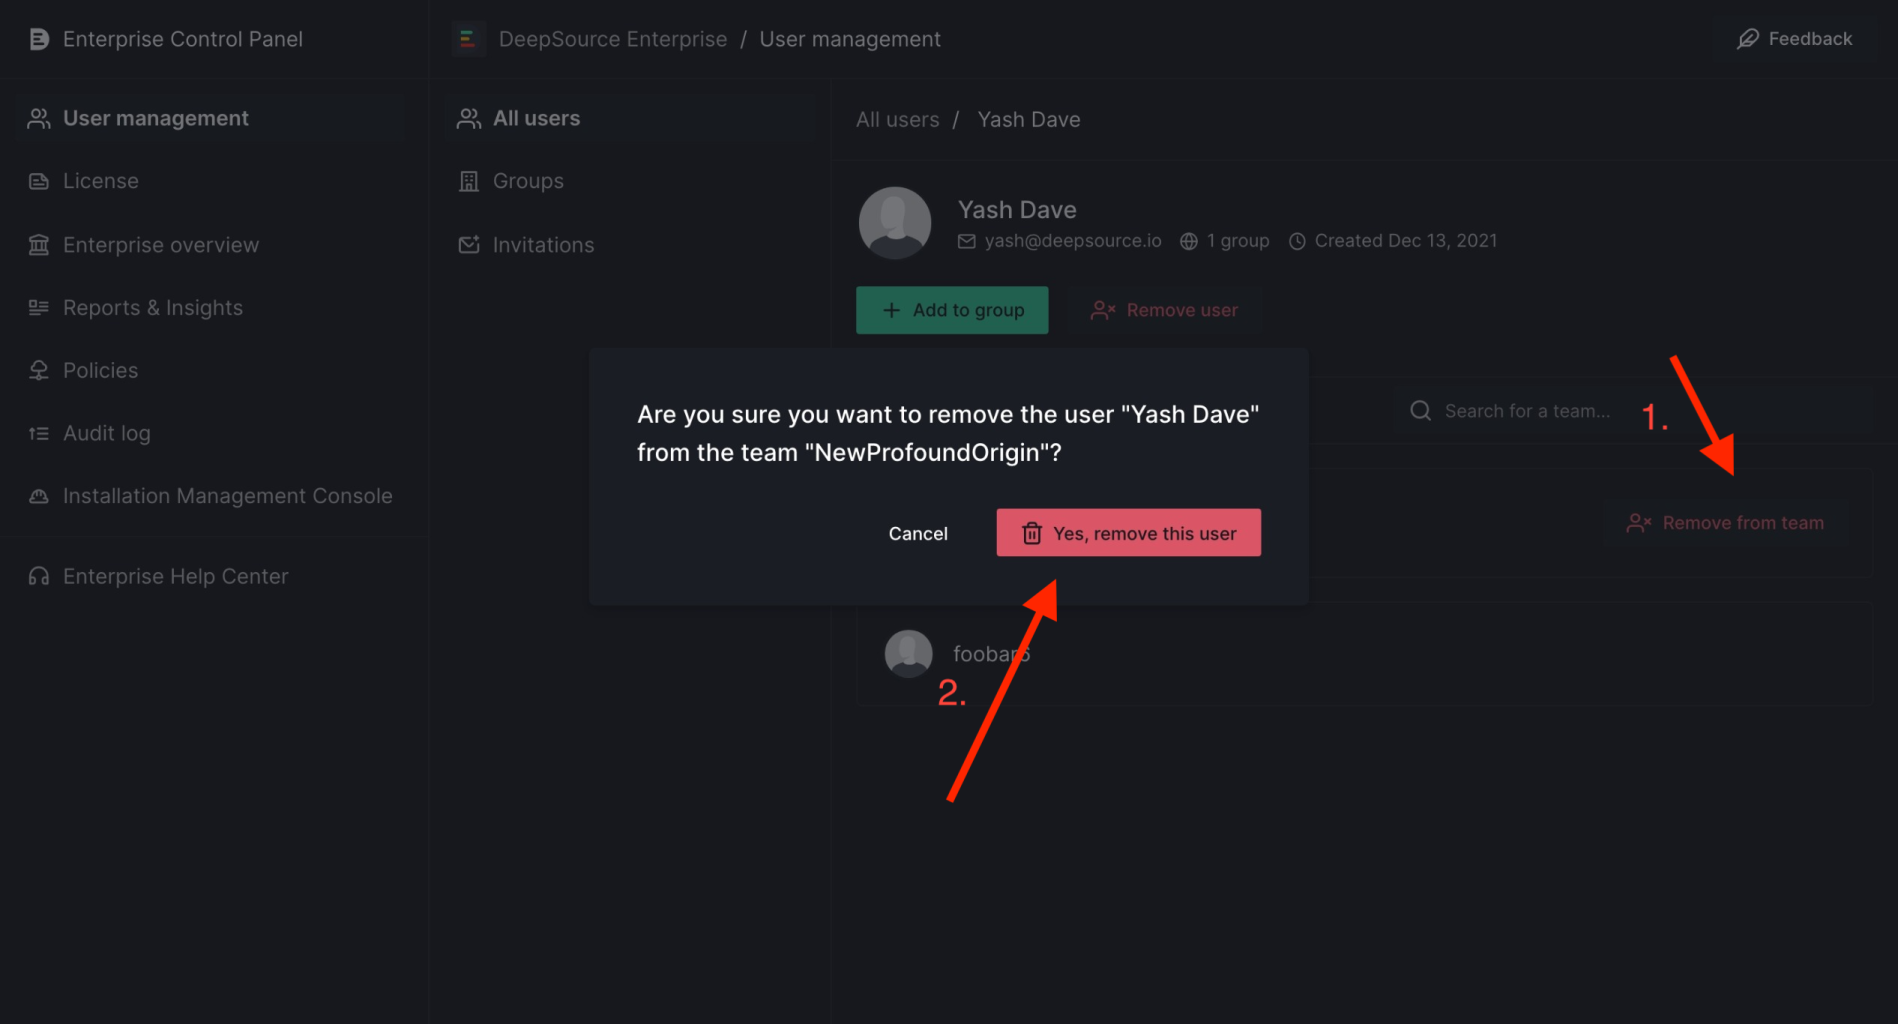
Remove a user from a team
- Navigate to the detailed view of a user via clicking on the user's card. Navigate to the team view by clicking on the
Teamstab. - Click on the
Remove user from teambutton present against the group that you want to remove the user from. - Verify the action within the confirm dialog and if correct, click on
Yes, remove this userto perform the action.
This button will only be available for the teams that the user is directly part of and will not be available against teams, that the user has access to, due to a group they are a part of.
Groups
Groups in Enterprise Server are for managing user access and permissions. This is different from Repository Groups in DeepSource Cloud, which are used to organize repositories into logical collections.
- Groups are useful when you want to assign similar access levels to multiple users. Multiple groups can be created for different user cohorts and a user can be part of more than one group.
- An admin can assign teams to a group. Teams can be added to a group with a specific role, like
admin,member, orcontributor— this will help decide the level of access the users of this group have to the particular team. - All the users that are part of the respective group, will directly get access to the selected teams as per the configuration.
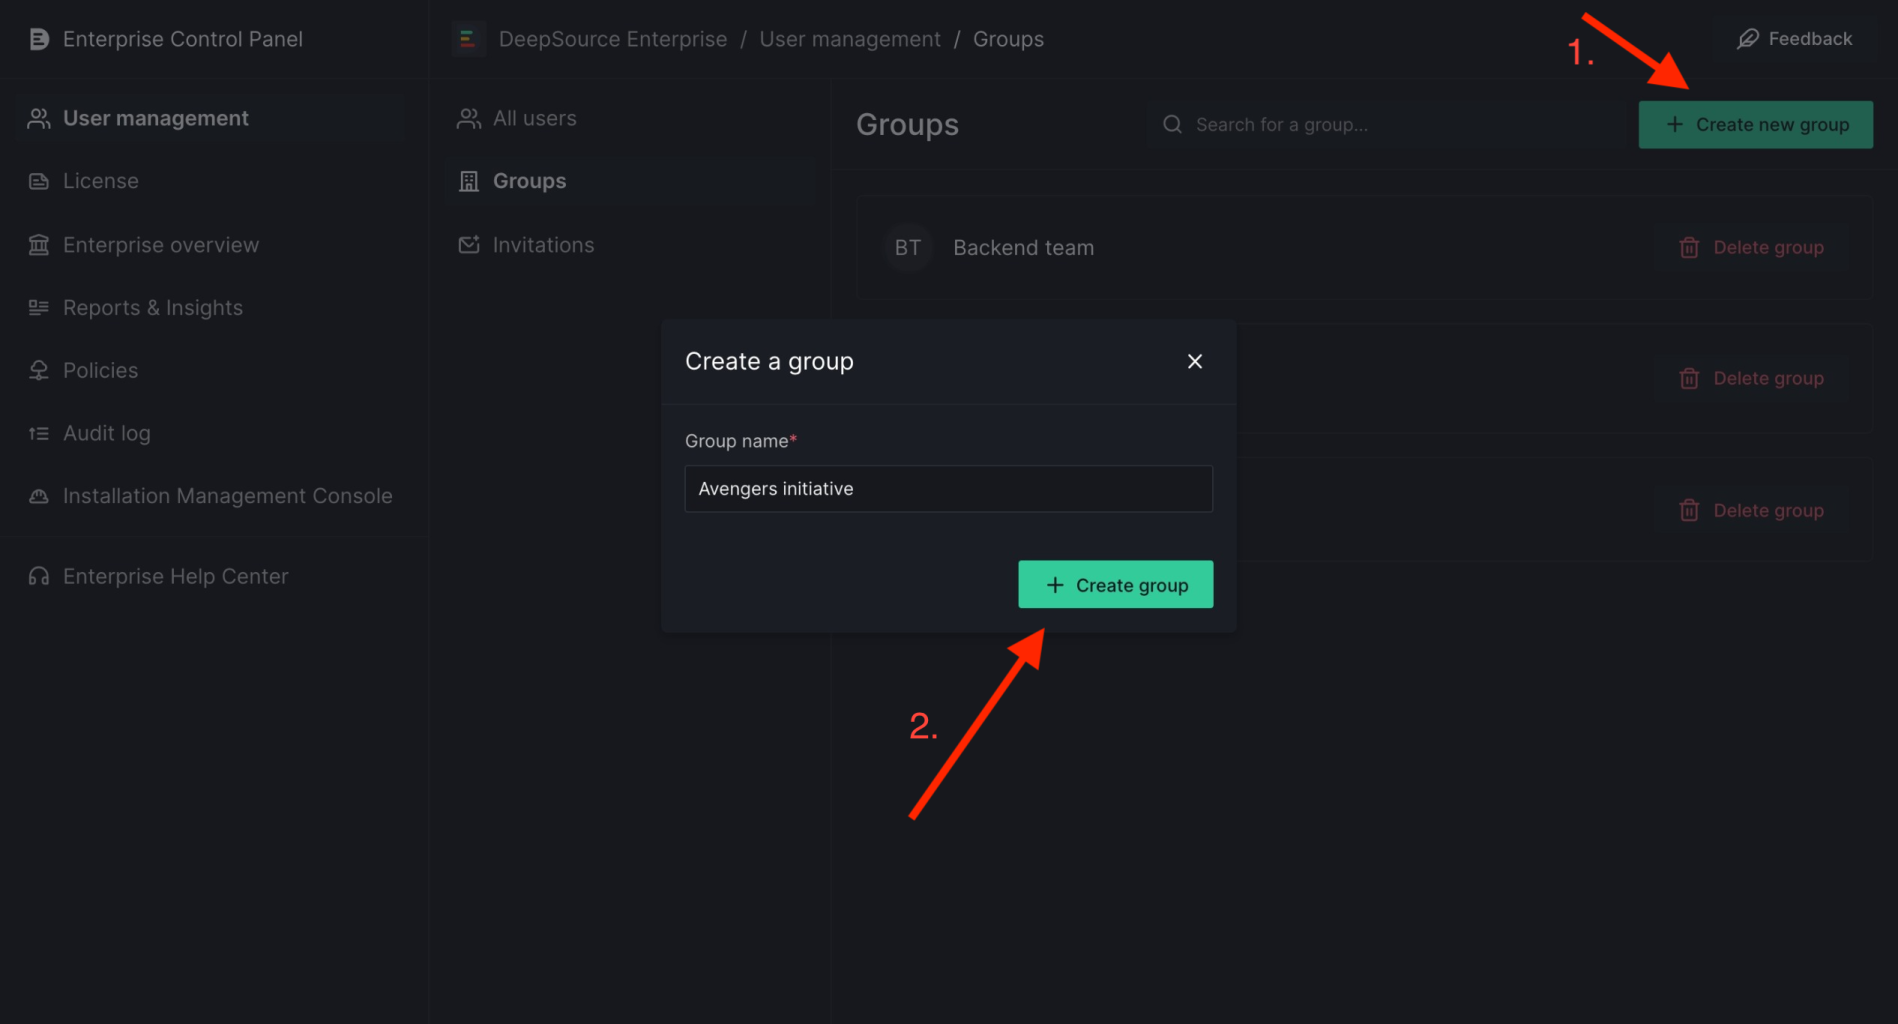
Create a group
- To create a group, go to the
Groupspage under theUser managementsection. - Click on the
+ Create new groupbutton on the top right of the screen to open the group creation dialog. - Enter a unique name for a group within the input labeled
Group name. - After entering a name, click the
+ Create groupbutton in order to create a group.
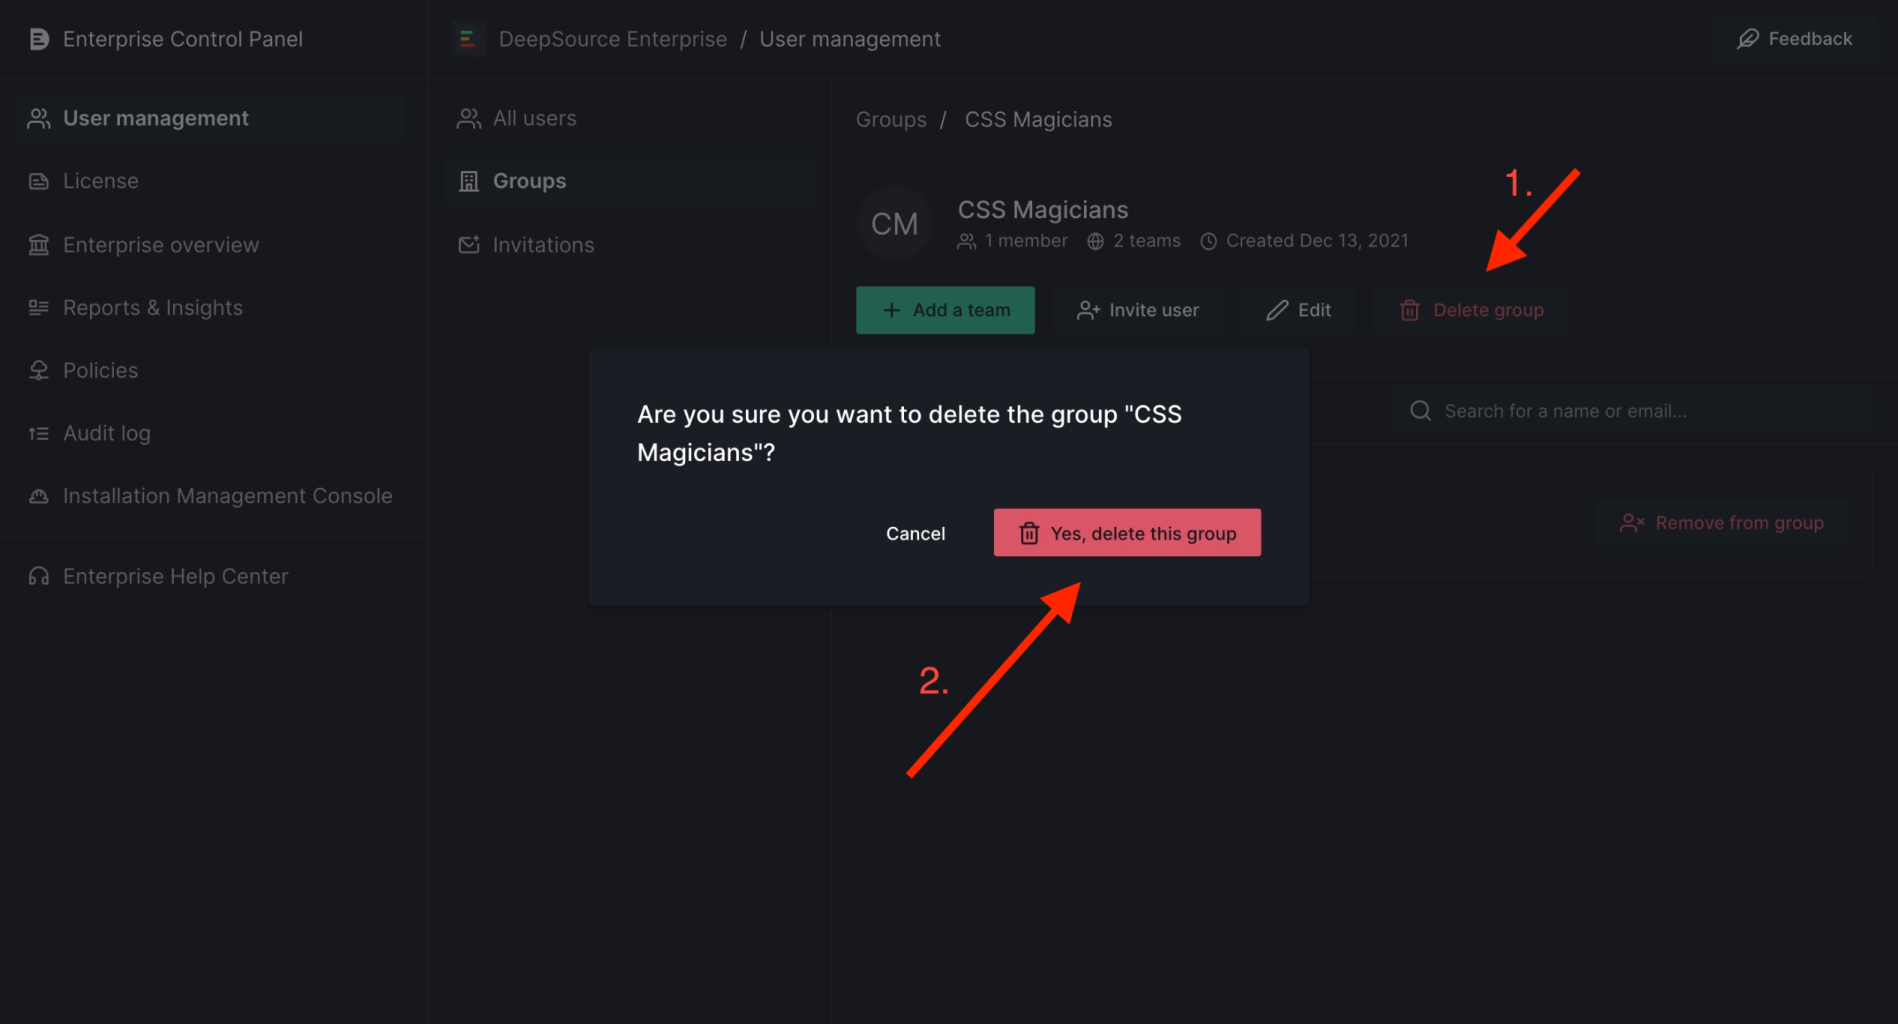
Delete a group
- Click the delete icon on the group list page, or click
Delete groupin the group detail view. - Confirm the deletion when prompted.
This is a destructive action and the group's data won't be recoverable once deleted.
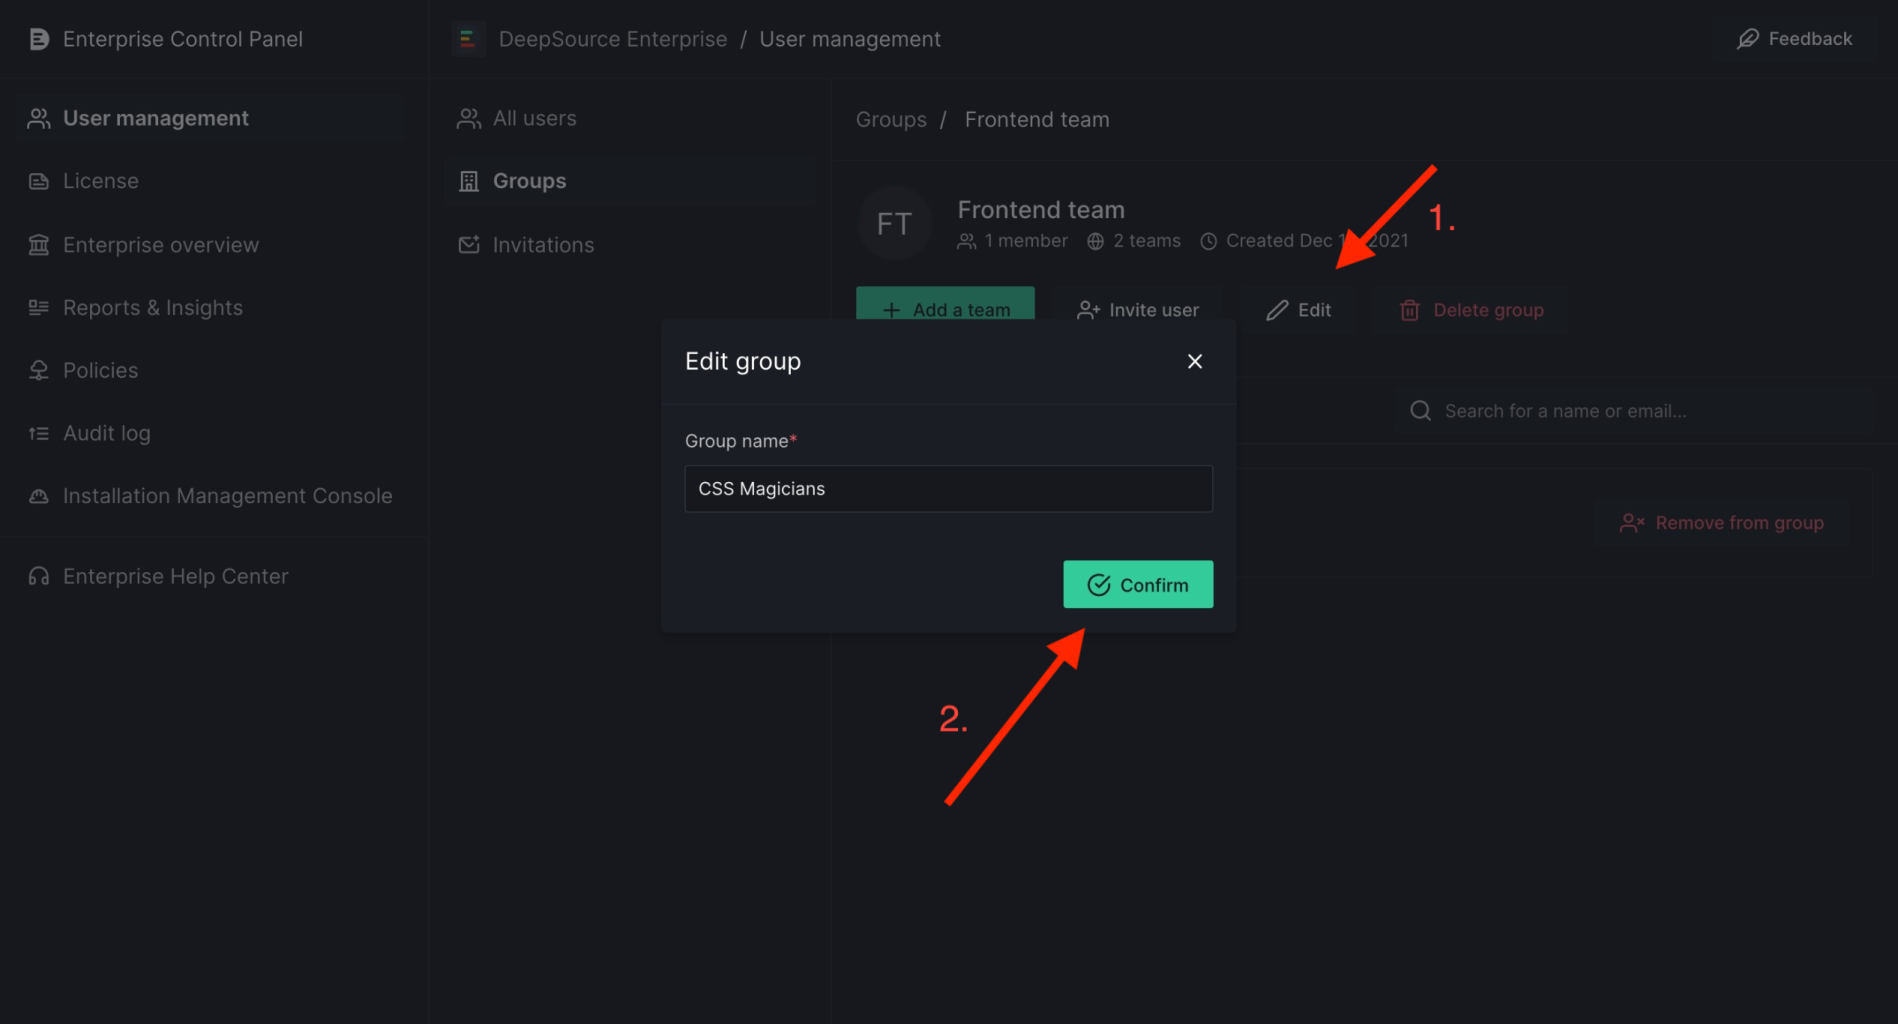
Edit a group's name
- To edit a group's name, click on the
Editbutton in the group's detailed view. - Change the name within the input as required.
- Click on the
Confirmbutton to update the group name.
Add a user to a group
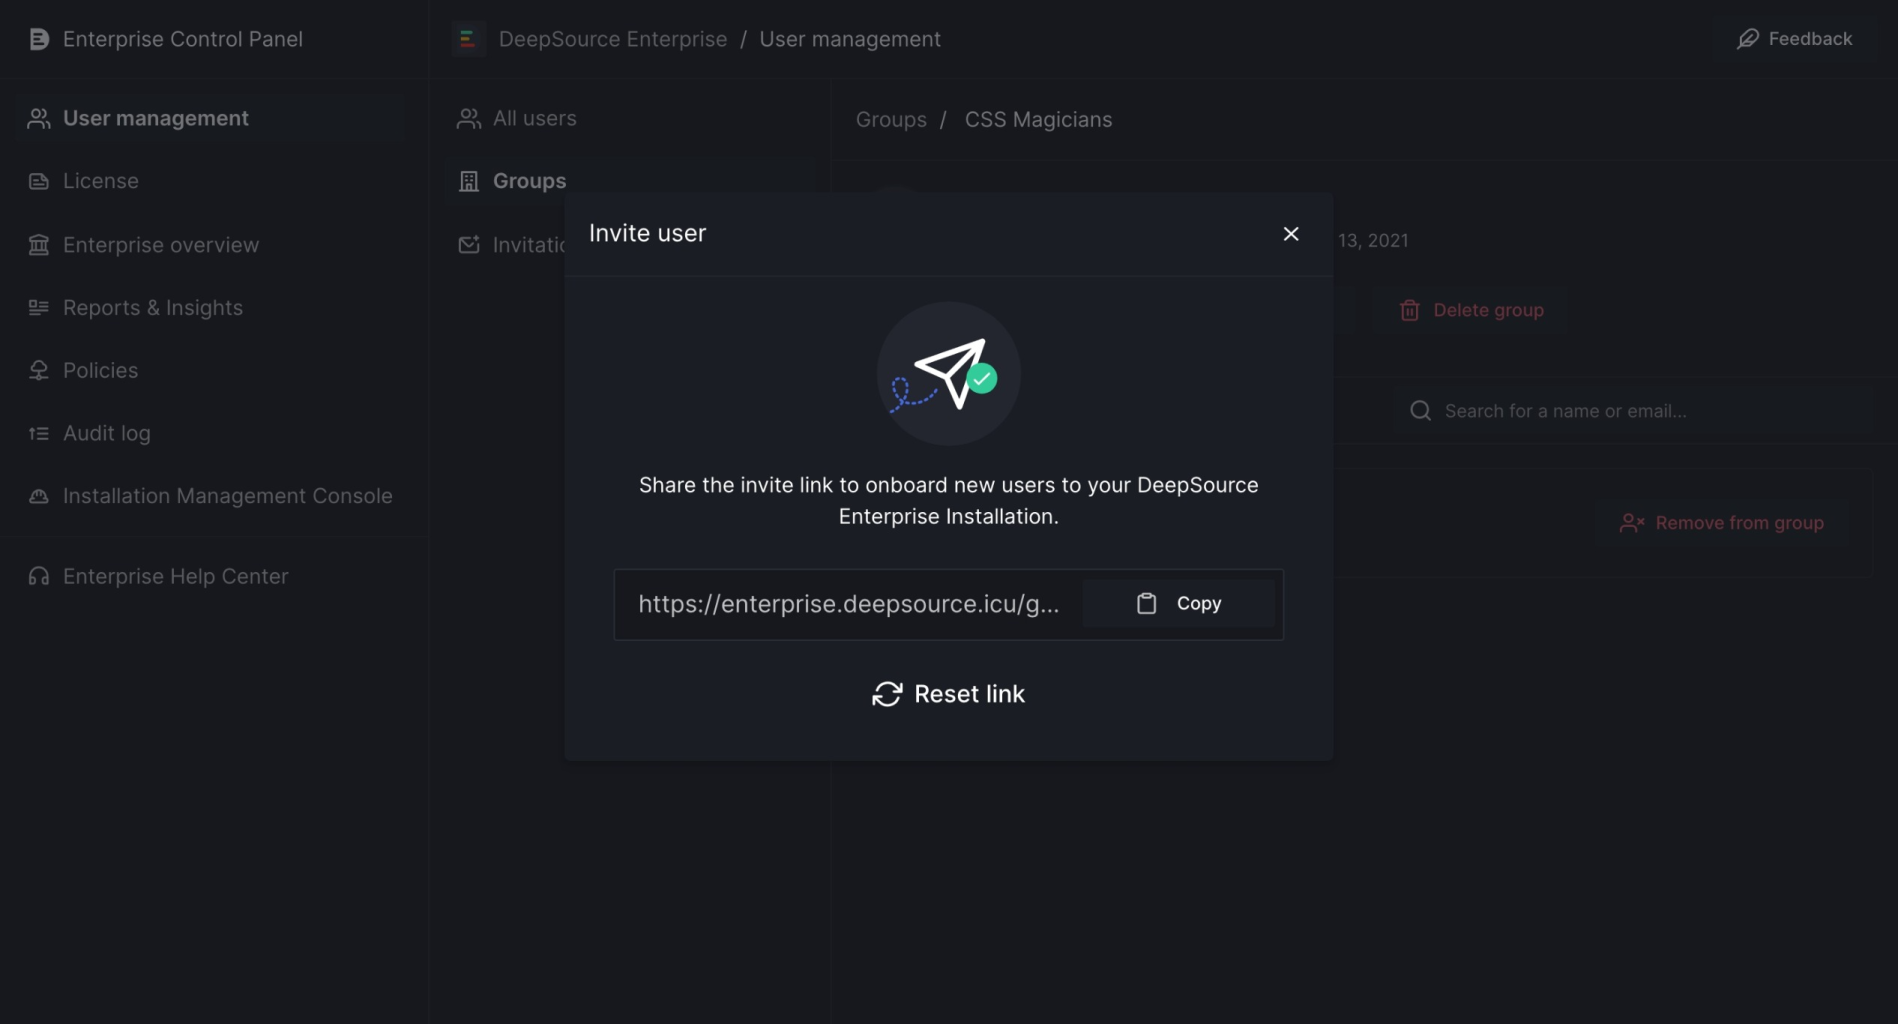
- Get the invite link to the group by either visiting the
Invitationspage or by clicking on theInvite userbutton on a group's detail page. - Share this link with the user, who will be able to join the group via the link by accepting the invitation.
If a need arises to reset the invitation link for a particular group, please use the Reset link button available below the invite link.
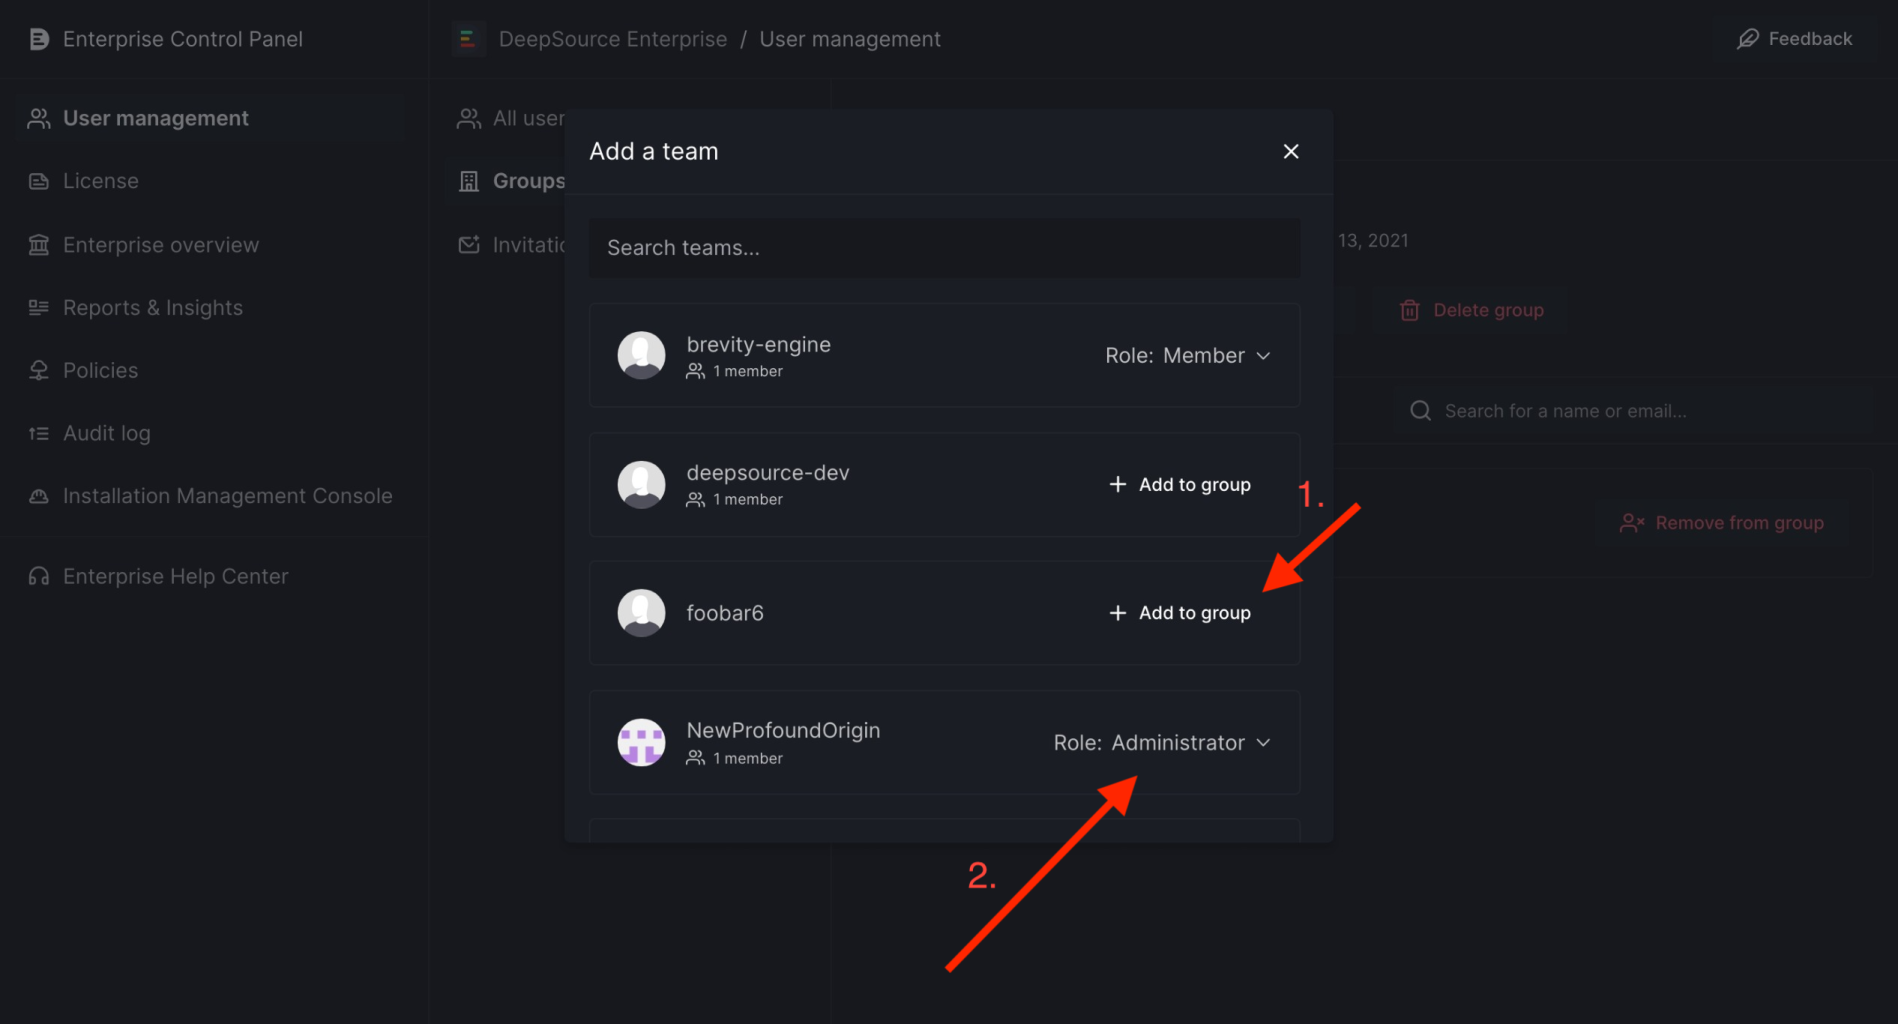
Add a team to a group
- Navigate to a group's detailed view via clicking on the group's card against the respective group.
- Click on the
Add a teambutton in the team's header to open theAdd a teamdialog. - Click the
Add to groupbutton against the respective team, to add the team to the group. The team will be added with the defaultContributoraccess level. This can be updated from the dialog or from theTeamstab in the group detail view as required.
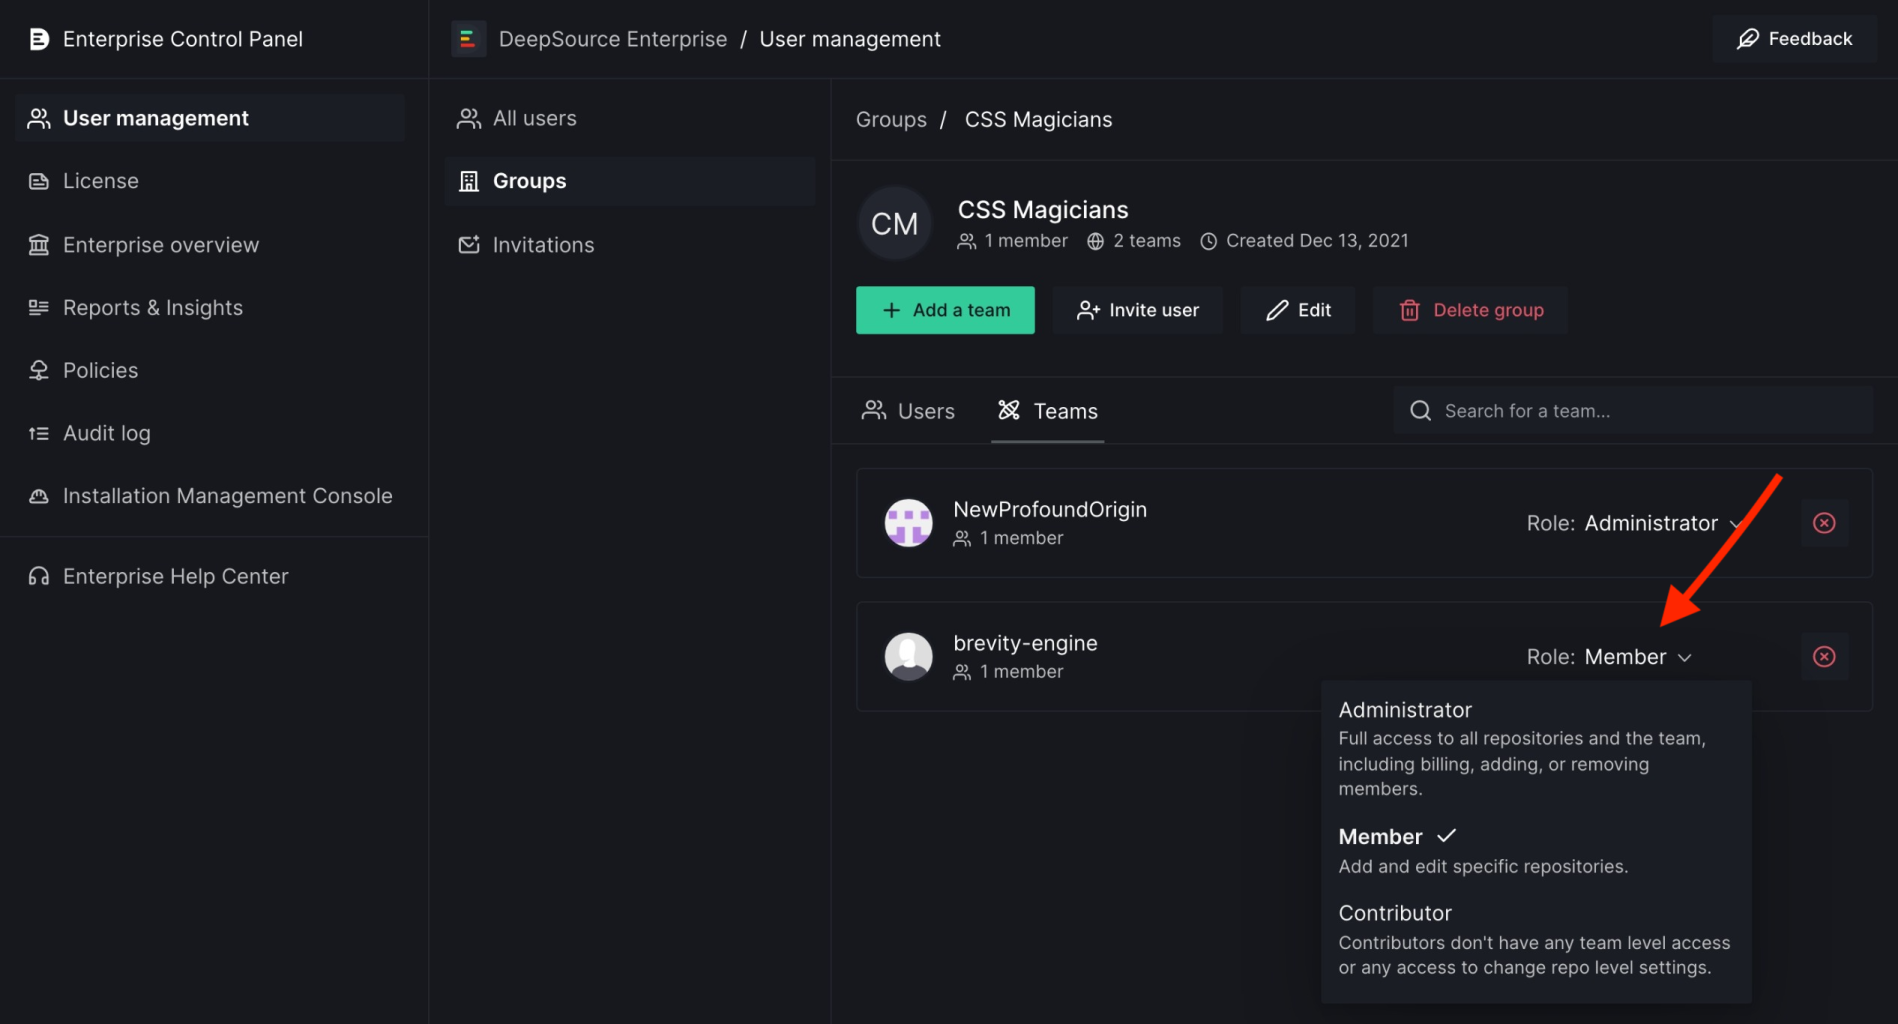
Update role of a team in a group
- Navigate to a group's detailed view via clicking on the group's card. Navigate to the team view by clicking on the
Teamstab. - Click on the role for a team within the team's card.
- Update the role by selecting an option from the available choices.
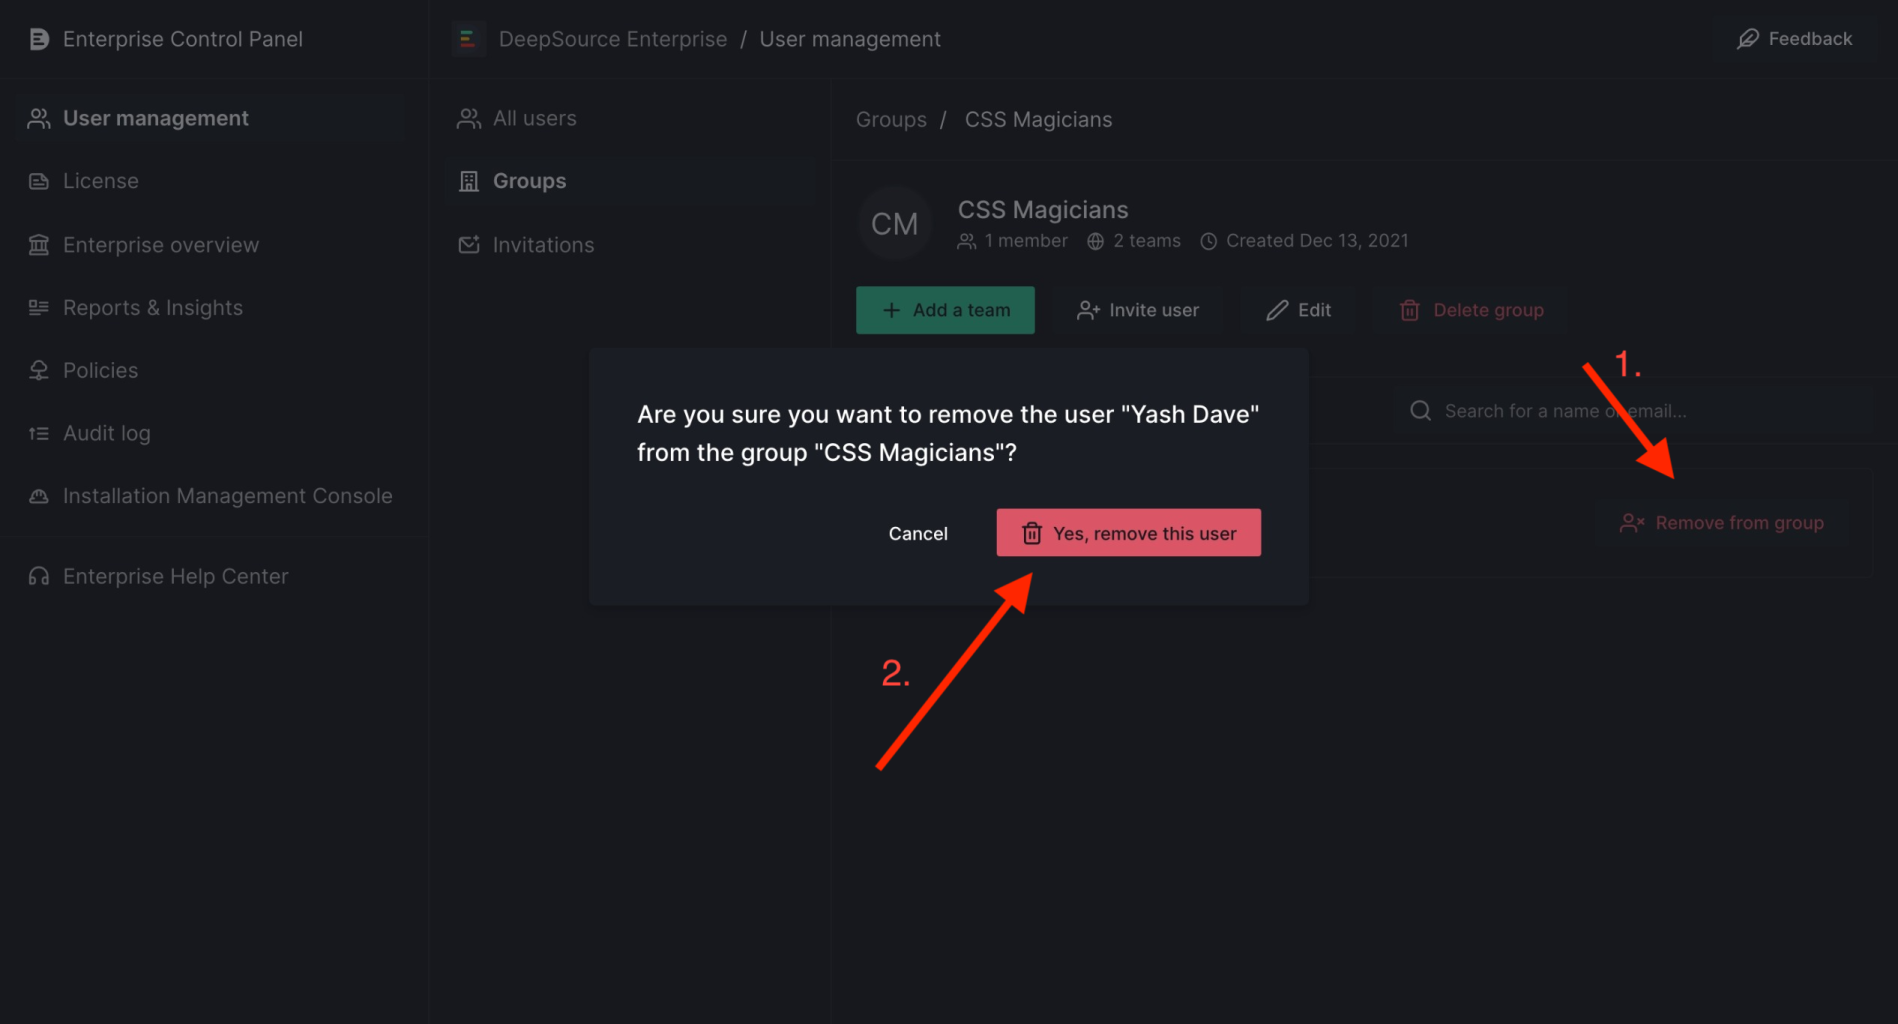
Remove a user from a group
- Navigate to the detailed view of a user via clicking on the group's card.
- Click on the
Remove user from groupbutton present against the group that you want to remove the user from. - Verify the action within the confirm dialog and if correct, click on
Yes, remove this userto perform the action.
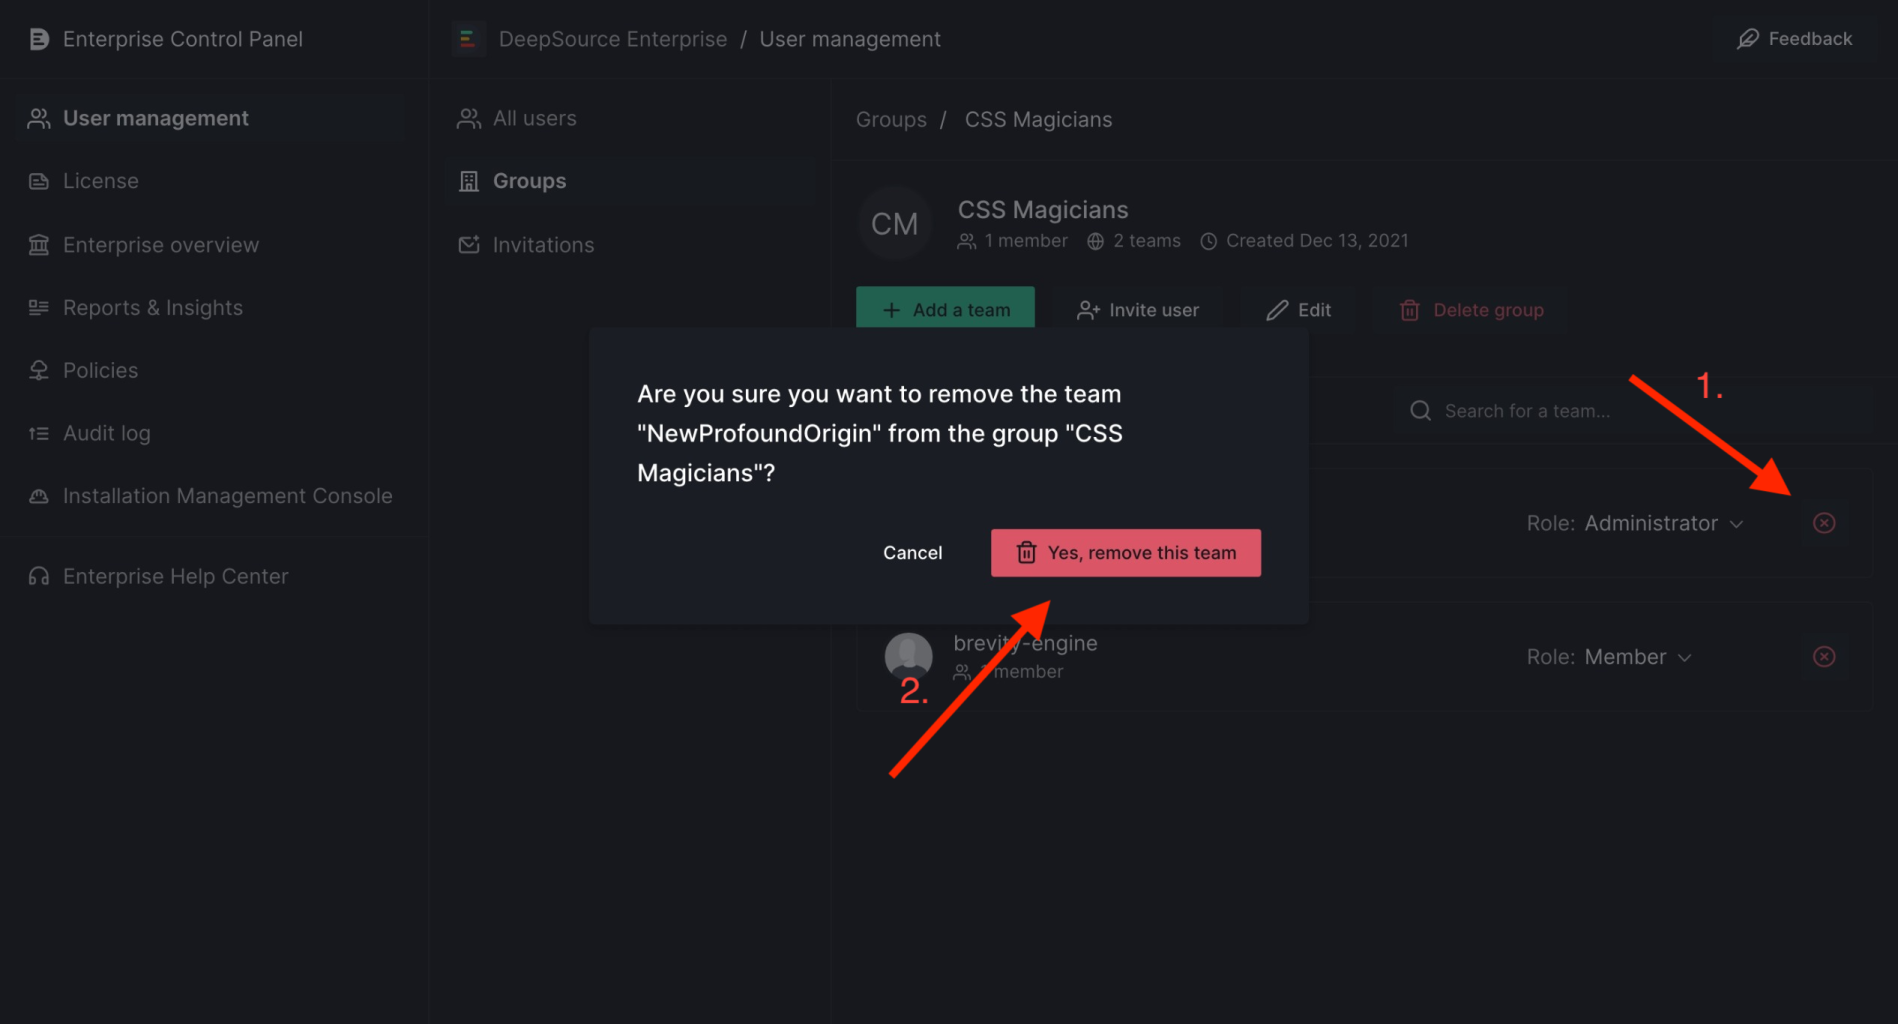
Remove a team from a group
- Navigate to the detailed view of a group via clicking on the group's card. Navigate to the team view by clicking on the
Teamstab. - Click on the button with the red-colored
xicon present against the team that you want to remove from the group. - Verify the action within the confirm dialog and if correct, click on
Yes, remove this teamto perform the action.
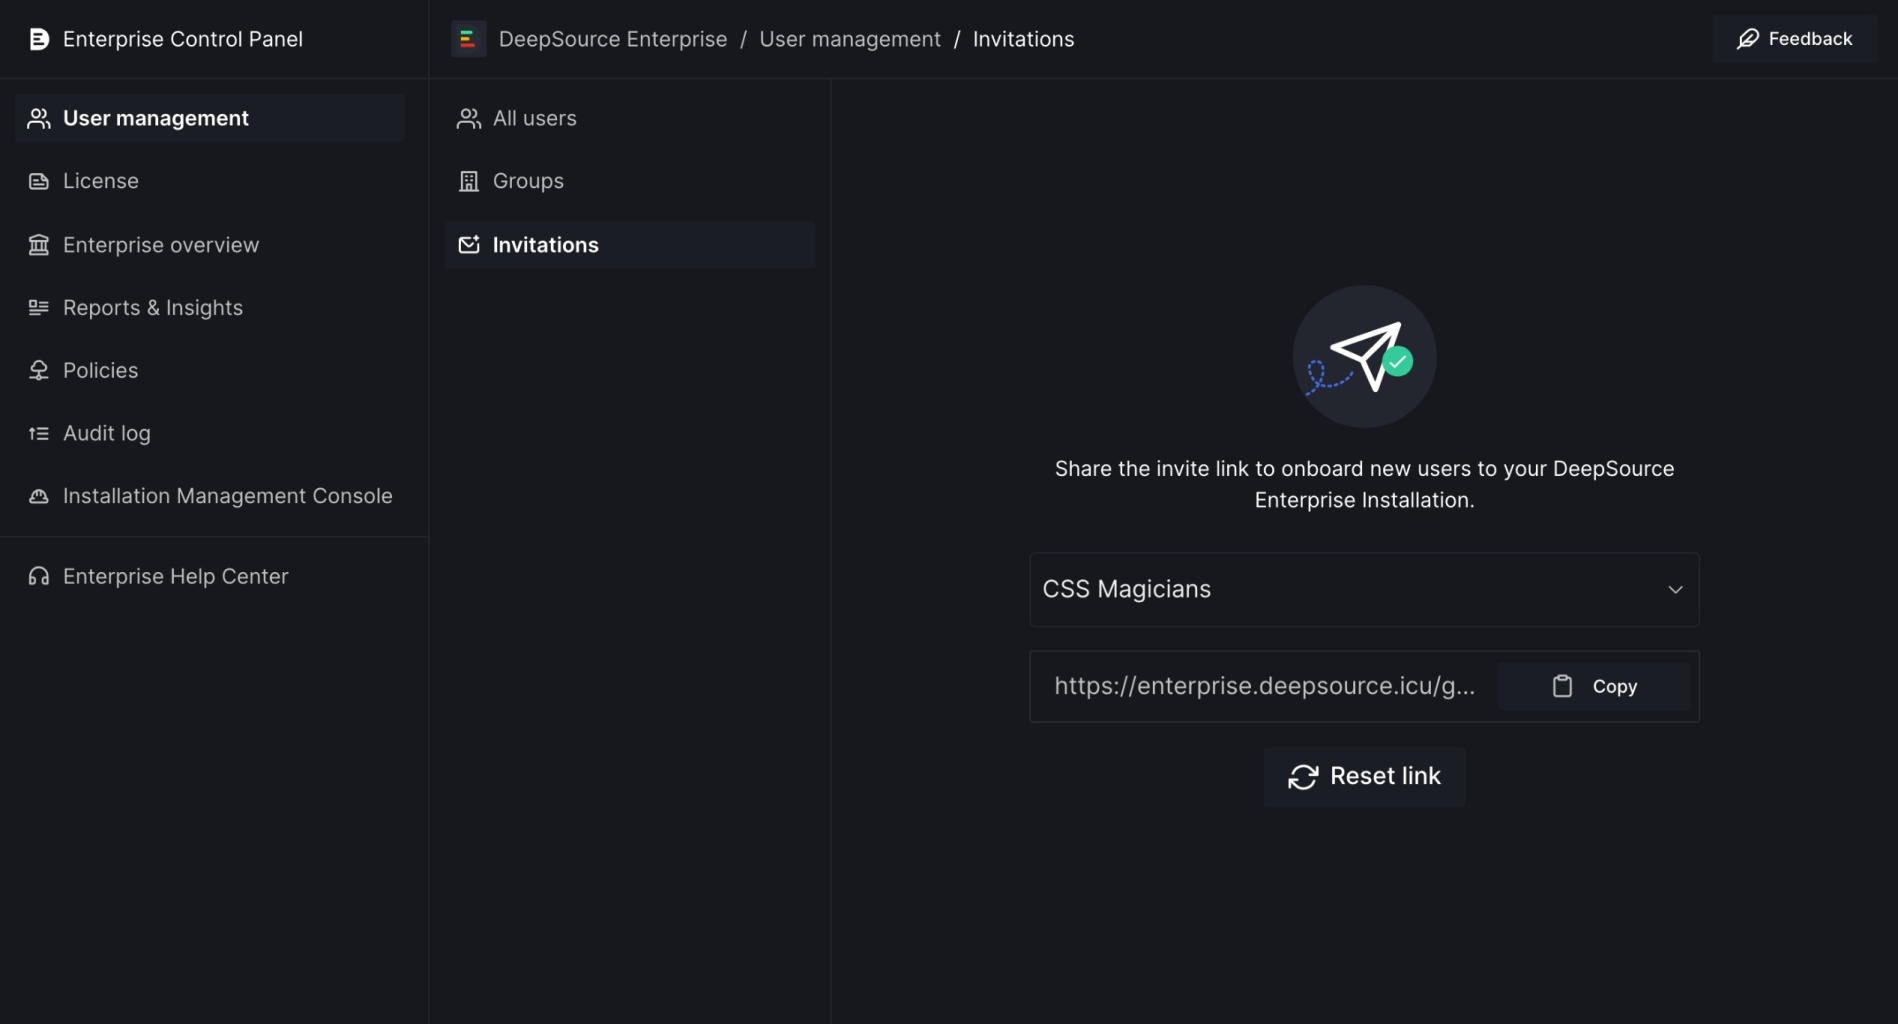
Invitations
The Invitations section is handy when you need to get an invitation URL for a group quickly. Here is how to do it:
- Select the group you want an invite for from the dropdown.
- You can then copy and share the invitation link.
- If required, the invitation URL for a group can be reset.