Test Coverage

The Test coverage Analyzer uses coverage report files generated after running tests to perform analysis.

Enabling this Analyzer will show you coverage metrics like Line Coverage, Branch Coverage, Condition Coverage, and, Composite Coverage.
The Analyzer also looks at lines of code that were never executed by any tests and raises actionable issues for them.

This section covers steps to get started with the test-coverage Analyzer. Please make sure to read the general configuration guide first.

Configuration - .deepsource.toml

To enable the Test coverage Analyzer, make sure you have it enabled in your .deepsource.toml configuration file.
This can be done by adding the following entry:

[[analyzers]]
name = "test-coverage"
enabled = true

Setup Test Coverage

The analysis begins as soon as the Analyzer recieves a valid coverage report. To do this, you can hook up the DeepSource CLI with your test CI and send the coverage report as soon as the tests finishes.

Set up DEEPSOURCE_DSN environment variable

DSN is used to associate the coverage artifact to the repository. This needs to be configured before sending a coverage artifact for analysis.

To look up the DSN:

  • Go to the Settings page of the repository dashboard in DeepSource
  • Go to the Code Coverage Section
  • Click on Copy button to copy your DSN.

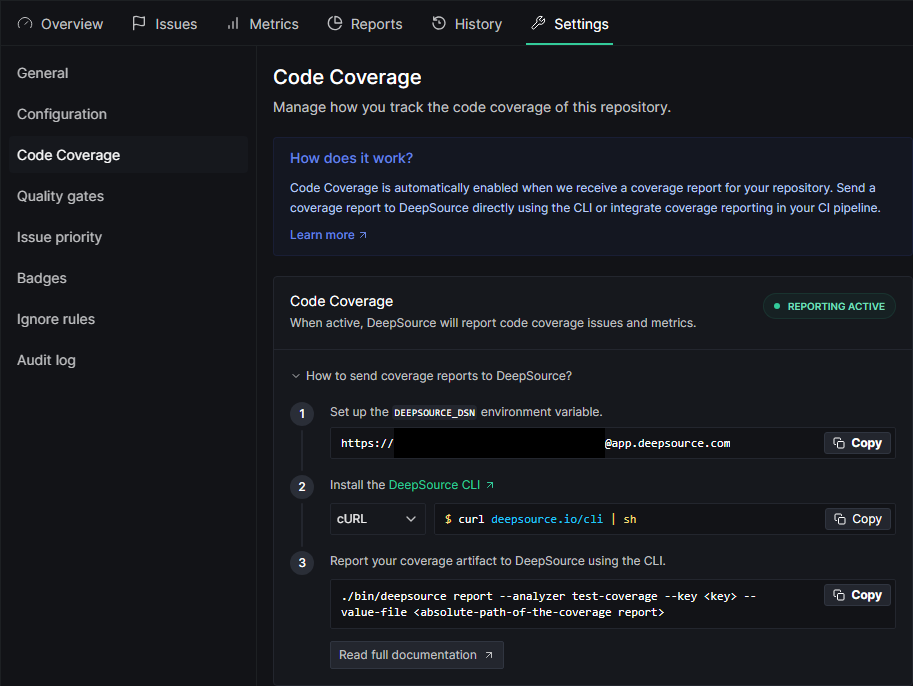
Once you get the DSN, please make sure you store it as an environment variable named DEEPSOURCE_DSN in your CI's environment.

Installing DeepSource CLI in your CI enviroment

curl https://deepsource.io/cli | sh

This command will create a bin directory in the command's current working directory($PWD/$0).
deepsource executable will be present inside bin.
We would use this executable for our CLI to DeepSource from now.

Reporting coverage artifact using the cli

This is the final step. Once you have the Test coverage reports generated. You can send it to DeepSource using the CLI.

Here's how the command looks like:

./bin/deepsource report --analyzer test-coverage --key <key> --value-file <absolute-path-of-the-coverage report>

In the above command, <key> is the language for which you'd be sending the coverage report.
Here's the whitelist of the keys and their respective formats we support.

KeyValue format
pythonXML (Cobertura), LCOV
gocover.out (Generated)
javascriptXML (Cobertura), LCOV
rubyJSON (SimpleCov)
javaXML (Jacoco/Clover), LCOV
kotlinXML (Jacoco, Kover)
scalaXML (Jacoco/Cobertura)
phpXML (Cobertura)
csharpXML (Cobertura)
cxxGCOV, LCOV
rustGCOV, LCOV
swiftLCOV

Please refer 'report' command of CLI documentation if you want to read more on the command usage.

📘

Please make sure you always run the above cli report command from the root of your repo. This will make sure that the filepaths in the test reports are handled to take care directories from your CI if they are present.

Failing to do that might result in issues not getting raised for your project. You'd still be able to see the metrics.

📘

The maximum allowed size for the coverage report file is 20 MB.

Submitting Multiple coverage reports

DeepSource supports merging coverage reports implicitly. If you have multiple CI pipelines generating partial coverage reports, send them as soon as they are generated under the same key name. DeepSource will combine all of them to prepare a final result. For example, if two CI pipelines test platform-specific parts of a module, you can report both the artifacts, and DeepSource will implicitly combine the results of the reports.

You'll notice a newly updated check every time you submit a new artifact. There's no time limit for sending multiple coverage reports.

📘

The JaCoCo and Clover coverage formats report metrics for individual methods and may not contain data about the individual covered lines in the methods.

For such cases, DeepSource uses a max operation on the reported metrics to calculate the aggregate report. So if parts of certain methods are covered in different coverage reports, the reported line coverage for that method may be lower than the actual line coverage.

For example, if one report covers the top 25% lines for a method, and another report covers the bottom 25% lines for the same method, since there is no way of knowing if both the lines in the reports are different, DeepSource will report the coverage to be 25% even though it might be 50%. This is only a limitation for JaCoCo and Clover coverage formats at the moment.

Examples

JavaScript

Jest

Currently, only the Cobertura XML format is supported by DeepSource.

Here are the steps to report JavaScript coverage data.

# Make sure `jest` is installed. If not, install it using `yarn`
yarn add --dev jest
# OR `npm`
npm install --save-dev jest

# Add the following options to the jest config to get a cobertura report
"collectCoverage": true,
"coverageReporters": ["cobertura"]

# Or, add these options as flags to test script in package.json
{
  "scripts": {
    "test": "jest --coverage=true --coverageReporters=cobertura"
  }
}

# Run the tests
yarn test
# OR
npm test

# Install 'deepsource CLI'
curl https://deepsource.io/cli | sh

# Set DEEPSOURCE_DSN env variable from repository settings page
export DEEPSOURCE_DSN=https://[email protected]

# From the root directory, run the report coverage command
./bin/deepsource report --analyzer test-coverage --key javascript --value-file ./coverage/cobertura-coverage.xml

📘

If the coverage file is generated at a path other than the root directory, pass that path to the value-file flag of the last command.

Example :

./bin/deepsource report --analyzer test-coverage --key javascript --value-file ./src/app/coverage/cobertura-coverage.xml

Go

go test

The analyzer supports coverage profile (report) for all three modes — set, atomic, and count generated by the go test.

This is how you can generate a coverage profile and report it to the analyzer:

# Run your tests and generate coverage report
go test -coverprofile=cover.out

# Install 'deepsource CLI'
curl https://deepsource.io/cli | sh

# Set DEEPSOURCE_DSN env variable from repository settings page
export DEEPSOURCE_DSN=https://[email protected]

# From the root directory, run the report coverage command
./bin/deepsource report --analyzer test-coverage --key go --value-file ./cover.out

Note: Tests for different Go packages

If you are running tests and generating coverage reports for different packages separately, you need to combine all generated coverage reports into a single file and submit that to the test-coverage analyzer.

This is how you can combine the coverage artifacts before reporting them:

# Run tests for a package
go test -coverprofile=cover.out ./somePackage

# Append coverage data in a separate file
cat cover.out >> coverage.out

# Run tests for another package
go test -coverprofile=cover.out ./someOtherPackage

# Combine the coverage data in the same way
cat cover.out >> coverage.out

# Install 'deepsource CLI'
curl https://deepsource.io/cli | sh

# Set DEEPSOURCE_DSN env variable from the repository settings page
export DEEPSOURCE_DSN=https://[email protected]


# From the root directory, run the report coverage command
./bin/deepsource report --analyzer test-coverage --key go --value-file ./coverage.out

Python

unittests

# Install coverage.py pacakage from pip
pip install coverage

# Run coverage
coverage run tests.py

# Generate coverage report in xml format
coverage xml

# Install 'deepsource CLI'
curl https://deepsource.io/cli | sh

# Set DEEPSOURCE_DSN env variable from repository settings page
export DEEPSOURCE_DSN=https://[email protected]

# From the root directory, run the report coverage command
./bin/deepsource report --analyzer test-coverage --key python --value-file ./coverage.xml

pytest

# Install pytest and pytest-cov pacakages from pip
pip install pytest pytest-cov

# Run pytest with --cov and --cov-report flags
pytest --cov=./ --cov-report xml

# Install deepsource CLI
curl https://deepsource.io/cli | sh

# Set DEEPSOURCE_DSN env variable from repository settings page
export DEEPSOURCE_DSN=https://[email protected]

# From the root directory, run the report coverage command
./bin/deepsource report --analyzer test-coverage --key python --value-file ./coverage.xml

Reference: https://pypi.org/project/pytest-cov/

nose2

# Install nose2 package from pip
pip install nose2[coverage_plugin]>=0.6.5

# Run nose with --with-coverage and --coverage-report flags
nose2 --with-coverage --coverage-report xml

# Install deepsource CLI
curl https://deepsource.io/cli | sh

# Set DEEPSOURCE_DSN env variable from repository settings page
export DEEPSOURCE_DSN=https://[email protected]

# From the root directory, run the report coverage command
./bin/deepsource report --analyzer test-coverage --key python --value-file ./coverage.xml

Reference: https://docs.nose2.io/en/latest/plugins/coverage.html

NOTE: Usage with tox

If you are using tox.readthedocs.io, make sure you omit .tox/* and env/* in your .coveragerc file because when running tests with tox, the coverage report will contain test report files other than your source (e.g site-packages, etc).

Here's an example of a .coveragerc file:

[run]
branch = True
source = src
omit =
    .tox/*
    env/*

With multiple python versions, combine the coverage data files before reporting.

Example tox.ini file:

[tox]
envlist = cov-init,py27,py36,py37,cov-report
skipsdist=True
skip_missing_interpreters=True


[testenv]
setenv =
    COVERAGE_FILE = .coverage.{envname}
deps =
    pytest
    pytest-cov
    coverage
commands =
    pytest --cov


[testenv:cov-init]
skipsdist = True
setenv =
    COVERAGE_FILE = .coverage
deps = coverage
commands =
    coverage erase


[testenv:cov-report]
skipsdist = True
setenv =
    COVERAGE_FILE = .coverage
deps = coverage
commands =
    coverage combine
    coverage report
    coverage xml

Ruby

SimpleCov

First, install simplecov if it is not already installed.

gem install simplecov

Then, follow the steps below to generate a test coverage report.

  1. Add the following lines to the spec_helper.rb file inside the tests folder of your project:
# frozen_string_literal: true

require 'simplecov'

SimpleCov.start
  1. Add --require spec_helper.rb to the .rspec file.
  2. Run rspec using bundle exec rake rspec to generate a coverage report.
  3. The coverage report will be available inside the coverage folder.

Once you have a coverage report, you can upload it to DeepSource using the following commands:

# Install deepsource CLI
curl https://deepsource.io/cli | sh

# Set DEEPSOURCE_DSN env variable from repository settings page
export DEEPSOURCE_DSN=https://[email protected]

# From the root directory, run the report coverage command
./bin/deepsource report --analyzer test-coverage --key ruby --value-file ./coverage/.resultset.json

📘

SimpleCov writes coverage results to a .resultset.json file. This is what you will want to upload to DeepSource.

Java

The test coverage analyzer supports test coverage metrics for Jacoco and Clover XML reports.

Jacoco

Setting up test coverage differs with each type of build system (Maven, Gradle, etc.). Here's an example of the configuration needed to run Jacoco on a maven repo:

<!-- Within pom.xml -->
...
    <plugin>
        <groupId>org.jacoco</groupId>
        <artifactId>jacoco-maven-plugin</artifactId>
        <version>0.8.2</version>
        <executions>
            <execution>
                <goals>
                    <goal>prepare-agent</goal>
                </goals>
            </execution>
            <!-- attached to Maven test phase -->
            <execution>
                <id>report</id>
                <phase>test</phase>
                <goals>
                    <goal>report</goal>
                </goals>
            </execution>
        </executions>
    </plugin>

...

Once you've added Jacoco to your project's pom.xml file, you should be able to run tests and generate the coverage report. The default location of the coverage report is target/site/jacoco/jacoco.xml.

mvn test

In case your project has multiple modules, you will need to use the jacoco:report-aggregate goal to merge all reports together.

After you have the XML test report, you can upload it to DeepSource using the cli:

# Install deepsource CLI
curl https://deepsource.io/cli | sh

# Set the DEEPSOURCE_DSN env variable from the reporting tab of
# your repository's DeepSource settings page.
export DEEPSOURCE_DSN=https://[email protected]

# From the project's root directory, run the report coverage command
./bin/deepsource report --analyzer test-coverage --key java --value-file target/site/jacoco/jacoco.xml

You should be able to proceed similarly with other build systems such as Ant or Gradle.

Reference: Jacoco documentation

Clover

DeepSource also supports reports generated using Atlassian's Clover coverage framework. Here's an example of using it with Maven:

    ...

    <build>
        <plugins>

            ...

            <plugin>
                <groupId>org.openclover</groupId>
                <artifactId>clover-maven-plugin</artifactId>
                <version>4.4.1</version>
                <configuration>
                </configuration>
                <executions>
                    <execution>
                        <phase>verify</phase>
                        <goals>
                            <goal>instrument</goal>
                            <goal>aggregate</goal>
                        </goals>
                    </execution>
                </executions>
            </plugin>
        </plugins>
    </build>

    ...

    <reporting>
        <plugins>
            <plugin>
                <groupId>org.openclover</groupId>
                <artifactId>clover-maven-plugin</artifactId>
                <version>4.4.1</version>
            </plugin>
        </plugins>
    </reporting>

    ...

Once you have added these elements to your project's pom.xml file, you will be able to instrument and run tests:

mvn clean clover:setup test clover:aggregate clover:clover

This will run tests and in the case of a multimodule project, aggregate the results into a single clover report.

The default output directory for the report is target/site/clover/clover.xml.

After you have the XML test report, you can upload it to DeepSource using the cli:

# Install deepsource CLI
curl https://deepsource.io/cli | sh

# Set the DEEPSOURCE_DSN env variable from the reporting tab of
# your repository's DeepSource settings page.
export DEEPSOURCE_DSN=https://[email protected]

# From the project's root directory, run the report coverage command
./bin/deepsource report --analyzer test-coverage --key java --value-file target/site/clover/clover.xml

You should be able to proceed similarly with other build systems such as Ant or Gradle.

Reference: Clover documentation

Kotlin

The test coverage analyzer supports test coverage metrics for Jacoco XML reports.

Jacoco

Setting up test coverage differs with each type of build system (Maven, Gradle, etc.). Here's an example of the configuration needed to run Jacoco on a maven repo:

<!-- Within pom.xml -->
...
    <plugin>
        <groupId>org.jacoco</groupId>
        <artifactId>jacoco-maven-plugin</artifactId>
        <version>0.8.2</version>
        <executions>
            <execution>
                <goals>
                    <goal>prepare-agent</goal>
                </goals>
            </execution>
            <!-- attached to Maven test phase -->
            <execution>
                <id>report</id>
                <phase>test</phase>
                <goals>
                    <goal>report</goal>
                </goals>
            </execution>
        </executions>
    </plugin>
...

Once you've added Jacoco to your project's pom.xml file, you should be able to run tests and generate the coverage report. The default location of the coverage report is target/site/jacoco/jacoco.xml.

mvn test

After you have the XML test report, you can upload it to DeepSource using the cli:

# Install deepsource CLI
curl https://deepsource.io/cli | sh

# Set the DEEPSOURCE_DSN env variable from the reporting tab of
# your repository's DeepSource settings page.
export DEEPSOURCE_DSN=https://[email protected]

# From the project's root directory, run the report coverage command
./bin/deepsource report --analyzer test-coverage --key kotlin --value-file target/site/jacoco/jacoco.xml

In case your project has multiple modules, you will need to use the jacoco:report-aggregate goal to merge all reports together.

Kover

If you have a gradle project, you can set up kover for report generation as well.

Add the following in your top-level build file:

plugins {
     id("org.jetbrains.kotlinx.kover") version "0.7.2"
}

Once you've applied the Kover Gradle plugin, Kover tasks for report generation and verification will be created. To generate XML reports, you can use the following command:

./gradlew koverXmlReport

koverXmlReport will build, execute tests and then write out an XML report in the specified report location. The default location for Kover reports is:build/reports/kover/xml/report.xml.

Note that kover will automatically run your full test suite by default. If you instead want to execute tests separately, make sure to include -x test in gradle's arguments.

You can then use the DeepSource CLI to upload this report:

# Install deepsource CLI
curl https://deepsource.io/cli | sh

# Set the DEEPSOURCE_DSN env variable from the reporting tab of
# your repository's DeepSource settings page.
export DEEPSOURCE_DSN=https://[email protected]

# From the project's root directory, run the report coverage command
./bin/deepsource report --analyzer test-coverage --key kotlin --value-file build/reports/kover/xml/report.xml

Scala

Jacoco

Add sbt-jacoco to your project by adding the following line to your project/plugins.sbt -

addSbtPlugin("com.github.sbt" % "sbt-jacoco" % "<version>")

Then run sbt jacoco to generate the coverage report. By default, you'll find the report in /target/scala-{version}/jacoco/report.

Note: To tweak Jacoco and its coverage behavior, you'll have to make changes to your build.sbt. Refer Jacoco's documentation
for more information on this.

Once you have a coverage report, you can upload it to DeepSource using the following commands:

# Install deepsource CLI
curl https://deepsource.io/cli | sh

# Set the DEEPSOURCE_DSN env variable from the reporting tab of
# your repository's DeepSource settings page.
export DEEPSOURCE_DSN=https://[email protected]

# From the project's root directory, run the report coverage command
./bin/deepsource report --analyzer test-coverage --key scala --value-file target/scala-2.13/jacoco/report/jacoco.xml

Note: Since we support Cobertura for other languages as well, you should be able to follow the above similar steps for generating and uploading your Cobertura report.

PHP

PHPUnit

Currently, only the Cobertura XML format is supported by DeepSource.

Here are the steps to report PHP coverage data.

# Install phpunit/phpunit pacakage from composer
composer require --dev phpunit/phpunit

# Run coverage
vendor/bin/phpunit --coverage-cobertura coverage.xml

# Install 'deepsource CLI'
curl https://deepsource.io/cli | sh

# Set DEEPSOURCE_DSN env variable from repository settings page
export DEEPSOURCE_DSN=https://[email protected]

# From the root directory, run the report coverage command
./bin/deepsource report --analyzer test-coverage --key php --value-file ./coverage.xml

Rust

# Install cargo-llvm-cov from crates.io
cargo +stable install cargo-llvm-cov

# Run coverage against `cargo test`
cargo llvm-cov --lcov --output-path coverage.info

# or, to merge issues of multiple tests or runs
# cargo llvm-cov clean --workspace # remove artifacts that may affect the coverage results
# cargo llvm-cov run --no-report # run coverage
# cargo llvm-cov --no-report --features a # test coverage of feature `a`
# cargo llvm-cov --no-report --features b # test coverage of feature `b`
# cargo llvm-cov report --lcov # generate report without rerunning anything

# Install 'deepsource CLI'
curl https://deepsource.io/cli | sh

# Set DEEPSOURCE_DSN env variable from repository settings page
export DEEPSOURCE_DSN=https://[email protected]

# From the root directory, run the report coverage command
./bin/deepsource report --analyzer test-coverage --key rust --value-file ./coverage.info

C & C++

GCC & LCOV

# Install lcov using package manager
# Or, use https://github.com/linux-test-project/lcov/releases

# Before running your build tool add,
# -fprofile-arcs -ftest-coverage to the command line flags

# For CMake, add to the cmake project
# SET(CMAKE_CXX_FLAGS "-g -O0 -Wall -fprofile-arcs -ftest-coverage")
# SET(CMAKE_C_FLAGS "-g -O0 -Wall -W -fprofile-arcs -ftest-coverage")
# SET(CMAKE_EXE_LINKER_FLAGS "-fprofile-arcs -ftest-coverage")

# For makefile, add it to the default compile command

# From the directory with in which files .gcno and .gcda are located.
lcov –c –d . –o coverage.info

# Install 'deepsource CLI'
curl https://deepsource.io/cli | sh

# Set DEEPSOURCE_DSN env variable from repository settings page
export DEEPSOURCE_DSN=https://[email protected]

# From the root directory, run the report coverage command
./bin/deepsource report --analyzer test-coverage --key cxx --value-file ./coverage.info

C#

Via dotnet test

# Run your tests
dotnet test --collect:"XPlat Code Coverage" --logger:"console;verbosity=detailed" --results-directory /tmp/test-results/

# Install 'deepsource CLI'
curl https://deepsource.io/cli | sh

# Set DEEPSOURCE_DSN env variable from repository settings page
export DEEPSOURCE_DSN=https://[email protected]

# From the root directory, run the report coverage command and provide the absolute file path to the generated report.
# In this case, the filepath looks something like /tmp/test-results/abcf7e0-b7df-4b0c-b919-7cb480d0f123/coverage.cobertura.xml
#
# Make sure to double check the test run ID, i.e. the GUID and the file path.
./bin/deepsource report --analyzer test-coverage --key csharp --value-file /tmp/test-results/<test_guid>/coverage.cobertura.xml

Swift

Currently, we support the LCOV format.

Here is an example of how to generate a coverage report in LCOV format using swift test and llvm-cov.

# Run the tests
swift test --enable-code-coverage

# Generate a coverage report in LCOV format using llvm-cov
# Here, the coverage data is being written to a file named 'info.lcov'
llvm-cov export -format="lcov" </path/to/YourProjectPackageTests.xctest> -instr-profile </path/to/default.profdata> > info.lcov

# Install 'deepsource CLI'
curl https://deepsource.io/cli | sh

# Set DEEPSOURCE_DSN env variable from repository settings page
export DEEPSOURCE_DSN=https://[email protected]

# From the root directory, run the report coverage command and provide the absolute path to the file having the coverage data
./bin/deepsource report --analyzer test-coverage --key swift --value-file info.lcov

Reporting coverage from tests running in Docker container

Running tests inside a Docker container is a widely used practice in the
software development community since it provides a consistent environment to run
the application.

But, at the same time it also adds isolation and therefore, the
test coverage reports generated inside the container are not accessible to the
outside environment i.e. the CI systems on which the testing pipeline is
running.

However, the following two methods can be used to report the test coverage
data to DeepSource.

Inside the Docker container

For reporting test coverage to DeepSource from inside the container which runs
tests, just pass some environment variables to the container using the --env/-e flag.

docker run -e DEEPSOURCE_DSN -e GITHUB_ACTIONS -e GITHUB_REF -e GITHUB_SHA ...
docker run -e DEEPSOURCE_DSN -e USER -e TRAVIS_PULL_REQUEST_SHA ...
# Export the latest git commit hash as an environment variable
export GIT_COMMIT_SHA=$(git --no-pager rev-parse HEAD | tr -d '\n')

# Pass the exported environment variable to the container in which tests
# need to be run
docker run -e DEEPSOURCE_DSN -e GIT_COMMIT_SHA ...

Outside the Docker container

The test coverage report can also be reported by copying it from the Docker container
in which tests are run to a shared directory which the host can also access.

# Creating a directory to store test coverage data in the host
# This directory will be mounted in the docker container as well
mkdir shared_coverage

# Run the Docker container which runs tests
# The `-v` flag sets up a bindmount volume that links the ~/coverage directory
# from inside the container to the ~/shared_coverage directory on the host machine.
docker run --name=test -v "~/shared_coverage:$HOME/coverage" ...

# Report the test coverage report stored in the shared directory to DeepSource
./bin/deepsource report --analyzer test-coverage --key python --value-file
./shared_coverage/coverage.xml

In the Dockerfile of the container which runs test, make sure that the generated test
coverage report is moved to the shared directory.

# In the container Dockerfile
mv coverage.xml ~/coverage

Automating Test Coverage Tracking with CI

If you're using a CI to run your tests, the recommended way to use the Test Coverage Analyzer is by automating the coverage reporting from your CI.
This should be done in the scripts that are running your tests.

These are the things that you'd need to take care of:

  1. Enable the test-coverage Analyzer in your repository's .deepsource.toml file.
  2. Make sure that your CI is checking out the same commit and not making a merge commit. Failing to do this would cause the coverage report to be associated with the merge commit, and DeepSource would never pick it up for a run.
  3. Install the DeepSource CLI. This would be needed to report the coverage artifact.
  4. DeepSource DSN for the repository. This is needed to identify the repository for which the coverage report is being sent. The CLI looks for the DSN

🚧

Do not add the DEEPSOURCE_DSN variable as part of any publicly visible configuration file. It contains sensitive information.

The sections below contain boilerplate config for different CI providers.
Please refer to this section to learn more about the CLI's report command used in the examples.

With Travis CI

  1. On Travis CI, go to Settings > Environment Variables and add a DEEPSOURCE_DSN environment variable with the DSN copied above as its value.

  2. Add this to .travis.yml:

    after_success:
      # Phase: Tests have finished and a test coverage report is available
    
      # Install the deepsource CLI
      - curl https://deepsource.io/cli | sh
    
      # From the root directory, run the report coverage command
      - ./bin/deepsource report --analyzer test-coverage --key python --value-file ./path/to/report
    

With Circle CI

  1. On Circle CI, go to Settings > Environment Variables and add a DEEPSOURCE_DSN environment variable with the DSN copied above as its value.

  2. Add the following step in .circleci/config.yml:

    - run:
      name: Report results to DeepSource
      command: |
        # Tests have finished and a test coverage report is available
    
        # Install the deepsource CLI
        curl https://deepsource.io/cli | sh
    
        # From the root directory, run the report coverage command
        ./bin/deepsource report --analyzer test-coverage --key python --value-file ./path/to/report
    

With GitHub Actions

  1. On GitHub, navigate to the main page of the repository. Under your repository name, click "Settings". In the left sidebar, click Secrets.

    • Type DEEPSOURCE_DSN in the "Name" input box.
    • Add the value copied above.
  2. When you checkout code, ensure that you use pull request HEAD commit instead of merge commit:

    🚧

    GitHub actions make a merge commit during checkout unless it is asked not to do it. If you're using GitHub actions, please make sure you make the following change in your checkout action.

      - uses: actions/checkout@v3
        with:
          ref: ${{ github.event.pull_request.head.sha }}
    
  3. Add the following step in .github/workflows/main.yml:

  - name: Report results to DeepSource
    run: |
    # Tests have finished and a test coverage report is available

    # Install deepsource CLI
      curl https://deepsource.io/cli | sh

    # From the root directory, run the report coverage command
      ./bin/deepsource report --analyzer test-coverage --key python --value-file ./path/to/report

    env:
      DEEPSOURCE_DSN: ${{ secrets.DEEPSOURCE_DSN }}

With GitLab CI

  1. Navigate to the project page of the repository on GitLab. Under project
    settings, in the sidebar, click on "CI/CD". Expand the variable
    section, and add the following:

    • Type: "Variable"`
    • Key: DEEPSOURCE_DSN
    • Value: The DSN value copied above
    • State: Protected (Yes)
    • Masked: Yes
    • Scope: All Environments
  2. Add the following under the test job in .gitlab-ci.yml:

    test:
      script:
        # Tests have finished and a test coverage report is available
    
        # Install deepsource CLI
        - curl https://deepsource.io/cli | sh
    
        # From the root directory, run the report coverage command
        - ./bin/deepsource report --analyzer test-coverage --key python --value file ./path/to/report
    

With Heroku CI

  1. Navigate to the app’s Settings tab in the Heroku Dashboard and then add the Config Variables:

    • KEY: DEEPSOURCE_DSN
    • VALUE: The DSN value copied above
  2. Run the following commands:

    # Tests have finished and a test coverage report is available
    
    # Install deepsource CLI
    - curl https://deepsource.io/cli | sh
    
    # From the root directory, run the report coverage command for DeepSource to analyze it
    - ./bin/deepsource report --analyzer test-coverage --key python --value-file ./path/to/report